

- Plan ItBack
- Design ItBack
- Build ItBack
- Homes
- ProductsBack
- CostsBack
- Self Build Cost Calculator
Estimate your project costs instantly with Build It's interactive self-build cost calculator
Calculate Now - Costs & Finance
- Contracts & Warranties
- Build It Estimating Service
Get an accurate, detailed cost breakdown of your project
Submit plans
- EventsBack


 Login/register to save Article for later
Guide to Foundations for Tricky Sites

Getting out of the ground is one of the great unknowns of self-building. The fact is, you can never be entirely certain what lies below the surface before you’ve dug the foundation trenches – and if any problems are going to affect your project, they’re likely to happen at this stage. The good news is that most of these issues are surmountable; and if you can identify them in advance, you should be able to solve them relatively cost-effectively.
Common plot challenges
Given their buying power and political clout, the major housebuilders tend to have first pick of the plots. They’re keen, unsurprisingly, to skim off the choicest examples – namely the level, easy-to-develop sites that, as far as they can identify, aren’t likely to fall foul of planning or practical issues.
This could change with the advent of the Right to Build but for the time being, the status quo remains and self-builders tend to get second dibs. That’s not to say there aren’t great sites out there – and indeed many developers won’t even consider sites of the size that might only support a single bespoke home. What’s more, some plot features that a big developer might label as problems may actually offer interesting opportunities for self-builders.
Your site might present a variety of issues that could impact on your foundation design. These range from steep gradients through to poor or infilled ground, the presence of trees and issues with service connections – to name but a few.
Do I need a soil survey?One of the golden rules for any self-build project is to find out as much as you can about the plot at the design stages – and the groundworks and foundations stage presents one of most common situations where costly issues can crop up. The cautious approach to managing this risk is to call in a structural engineer specialising in this area and have them conduct a full-blown soil survey, including digging test trenches. The problem with this is that they’ll naturally gravitate towards more highly engineered (and expensive) solutions, as they need to protect their reputation (not to mention their professional indemnity insurance). That’s not to say you shouldn’t investigate your site – there may just be better ways of going about it. Most local building control inspectors are well-versed in soil conditions in their local areas, not to mention the potential impact of issues such as nearby trees. They may well ask for a small trial pit to be dug close to where you’re planning to excavate the actual foundations; and should this be all clear, you can be relatively confident that standard strip or trenchfill will work for your site. Clearly, this could save you considerable cash at the outset of your scheme. If your conversation with the inspector identifies any red flags, such as known shrinkable clays or poor bearing capacities, then they will probably insist you commission a professional survey. If that does happen, at least you’ll be doing so knowing that you’re paying for an essential service rather than what could turn out to be a luxury. |
Solutions for tricky sites
The good news is that, in most cases, these headaches can be fairly easily and cost-effectively navigated, especially if they’re identified early on in the planning process.
The first port of call on most self-builds is to ascertain whether basic strip or trench foundations will be suitable for the site, as these are the quickest and cheapest options. They are usually excavated to a depth of around 1m, although this can quickly change in poor soils or close to trees. Your site investigations should give you the lay of the land. If you can’t use standard options, try:
1. Digging deep
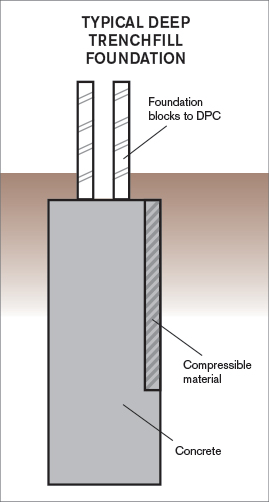
The most straightforward route to dealing with difficult conditions on site is often to simply increase the depth of standard strip or (more likely) trenchfill foundations. Fundamentally, if you burrow down far enough you should find suitably firm, stable ground.
Bear in mind, however, that if you need to go any deeper than 2.5m, engineered solutions such as piles or rafts will become a more economical choice.
In areas featuring shrinkable clay soil, the vertical face of trenchfill foundations might need to be lined on one or both sides with compressible material or a special slip membrane. This can help to mitigate the effects of swelling and contraction in the soil as moisture levels change.
2. Piled foundations
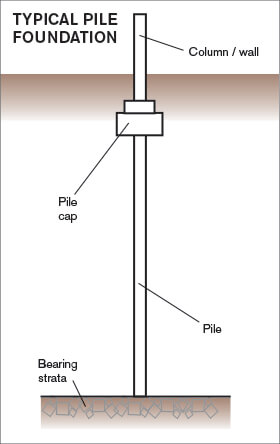
This technique allows you to bypass weak layers of soil near the surface and reach a suitable base at a greater depth, using long structural columns that are typically around 300mm to 600mm in diameter. These are pushed into the ground to the required depth and then topped with a concrete ringbeam (also known as a ground beam), which acts as a base from which to build up the walls.
Piled foundations must be designed by a suitably qualified engineer, who will ensure the columns distribute loads evenly in the surrounding soil. The most popular option is to bore into the ground with a large auger (a rotating drill-like shaft fitted with cutting blades) and then fill the hole with reinforced concrete.
In weak soils, the hole is cased to support the sides until such point as the concrete pour can go ahead. The continuous flight auger is a slight twist on this method, featuring a hollow core through which concrete can be pumped as the drill is removed. These solutions tend to cause the least vibration, so can be more suited to urban locations.
Other options include using pre-cast concrete columns, which can be hammered into a pilot hole using a pile driver, or helical piles that are wound into the ground like gigantic screws. These are quick methods that minimise the amount of spoil created.
Mini piling rigs are available in both driver and screw varieties, and can be ideal for domestic projects – especially where access is difficult, perhaps due to a tight plot or awkward trees. This method is sometimes used for underpinning existing foundations.
3. Pad foundations
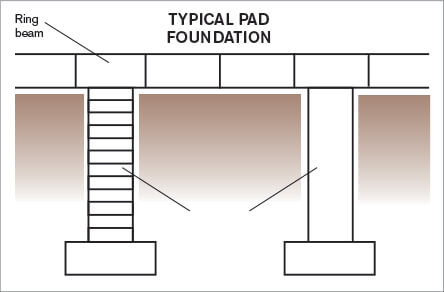
For this setup, a series of large pits is dug – usually by machine to a fairly shallow depth (around a metre). A concrete pad is then cast in the bottom of the hole, to the specified thickness and with steel reinforcement as required.
The foundations are built up from here in the form of brick or reinforced concrete piers (steel posts can also be used). A reinforced ringbeam can be added to connect the piers and provide a surface to build off.
The method is sometimes preferred for building systems such as oak or steel frame. This is because it’s ideal for transferring point loads from this kind of skeletal structure into the bearing layer below, whilst also minimising the amount of excavation and concrete involved. The downside is that, as your groundworkers will be dealing with deep yet compact trenches, it can be pretty labour intensive.
Pads can also be useful for projects where there’s made ground or soil with poor bearing capacity, but a bed of more stable material can still be found within a reasonable depth. The method can also be appropriate for use on sites where nearby trees are being retained, as it minimises the risk of the excavations or finished foundations coming into contact with roots.
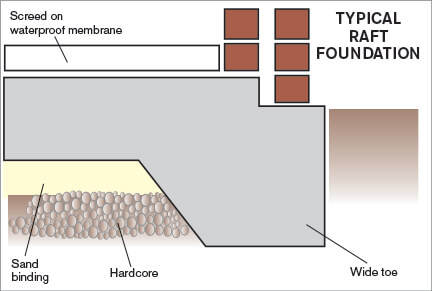
4. Raft foundations
Fundamentally, this method involves forming a rigid slab of reinforced concrete that’s cast over the whole footprint of your new home. This can be ground-bearing, or may be laid over a bed of granular fill depending on soil conditions. The raft may be thickened beneath the main loadbearing walls if required (this is known as a wide toe – and is particularly common where the soil has poor compressibility).
As this method involves creating a greater contact area with the subsoil, it spreads the loads of the building over the whole ground floor area – creating a floating raft that can accommodate movement without affecting the structure above.
This makes it a contender for sites where the soil has a poor bearing capacity (eg peats and silts) or is relatively unstable – perhaps because of former mining activities, compressible backfills or the presence of expansive clays.
One advantage of a raft is that relatively little digging is needed (the site is typically scraped to a depth of around 300mm-600mm). It’s therefore not too labour intensive and comes into its own where other systems would require significant excavation.
The amount of concrete required makes it an expensive solution, but in the right circumstances it can be cheaper than piling. What’s more, as you’re casting the foundations and floor slab at the same time, and it represents a fast route to getting out of the ground.
Passive raft foundations have become a popular solution for eco projects, as they allow for a relatively straightforward route to preventing energy-sapping thermal bridges.
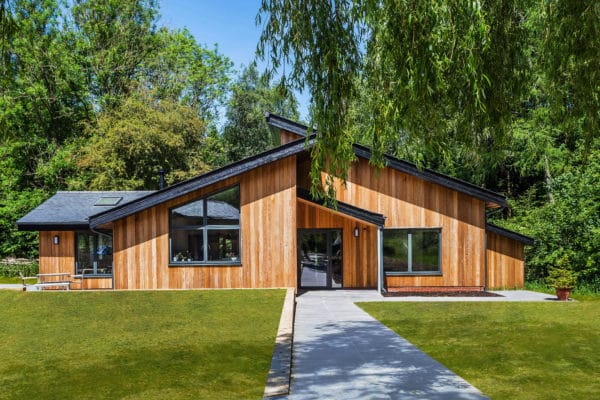
Main image: A Coastal Haven
Chris Batesmith


You may be interested in


Comments are closed.