- Plan ItBack
- Design ItBack
- Build ItBack
- Homes
- ProductsBack
- CostsBack
- Self Build Cost Calculator
Estimate your project costs instantly with Build It's interactive self-build cost calculator
Calculate Now - Costs & Finance
- Contracts & Warranties
- Build It Estimating Service
Get an accurate, detailed cost breakdown of your project
Submit plans
- EventsBack


 Login/register to save Article for later
First Fix vs Second Fix Building Work Stages – What’s the Difference?

The first fix and second fix building works are the stages in your project when your dream house finally begins to turn into a home. They take place after the shell of your project is wind and watertight, which means the key features such as plastering, wiring electrics and insulating can get underway.
The internal works are collectively referred to as first fix, which is essentially the infrastructure prior to the walls being plastered. The second fix is therefore when all the visible fittings and products will be installed, such as flooring and tiling etc.
This will be an exciting time for those on the self build journey as all the details will begin coming together. Although, it is important to not rush this part of the works, as completing these stages effectively is key to successfully project managing a build. So, here we have everything that you need to know for when starting this stage of your self build project.
All the images in this article were taken during construction of Build It’s Self Build Education House – located in Graven Hill, Bicester. Find out more about the project and take an interactive tour of the Education House here.
Jump to first fix & second fix building work FAQs answered
What Does it Mean When a Self Build is Wind & Watertight?
This term can sometimes be a bit misleading, as the wind and watertight stage is often achieved well before the windows and external doors have been installed – most commonly with temporary polythene sheeting tacked over these openings, for instance. Its real meaning is to denote the stage where the building structure has been erected – be it timber frame, SIPs or masonry construction – and the roof covering has been applied.

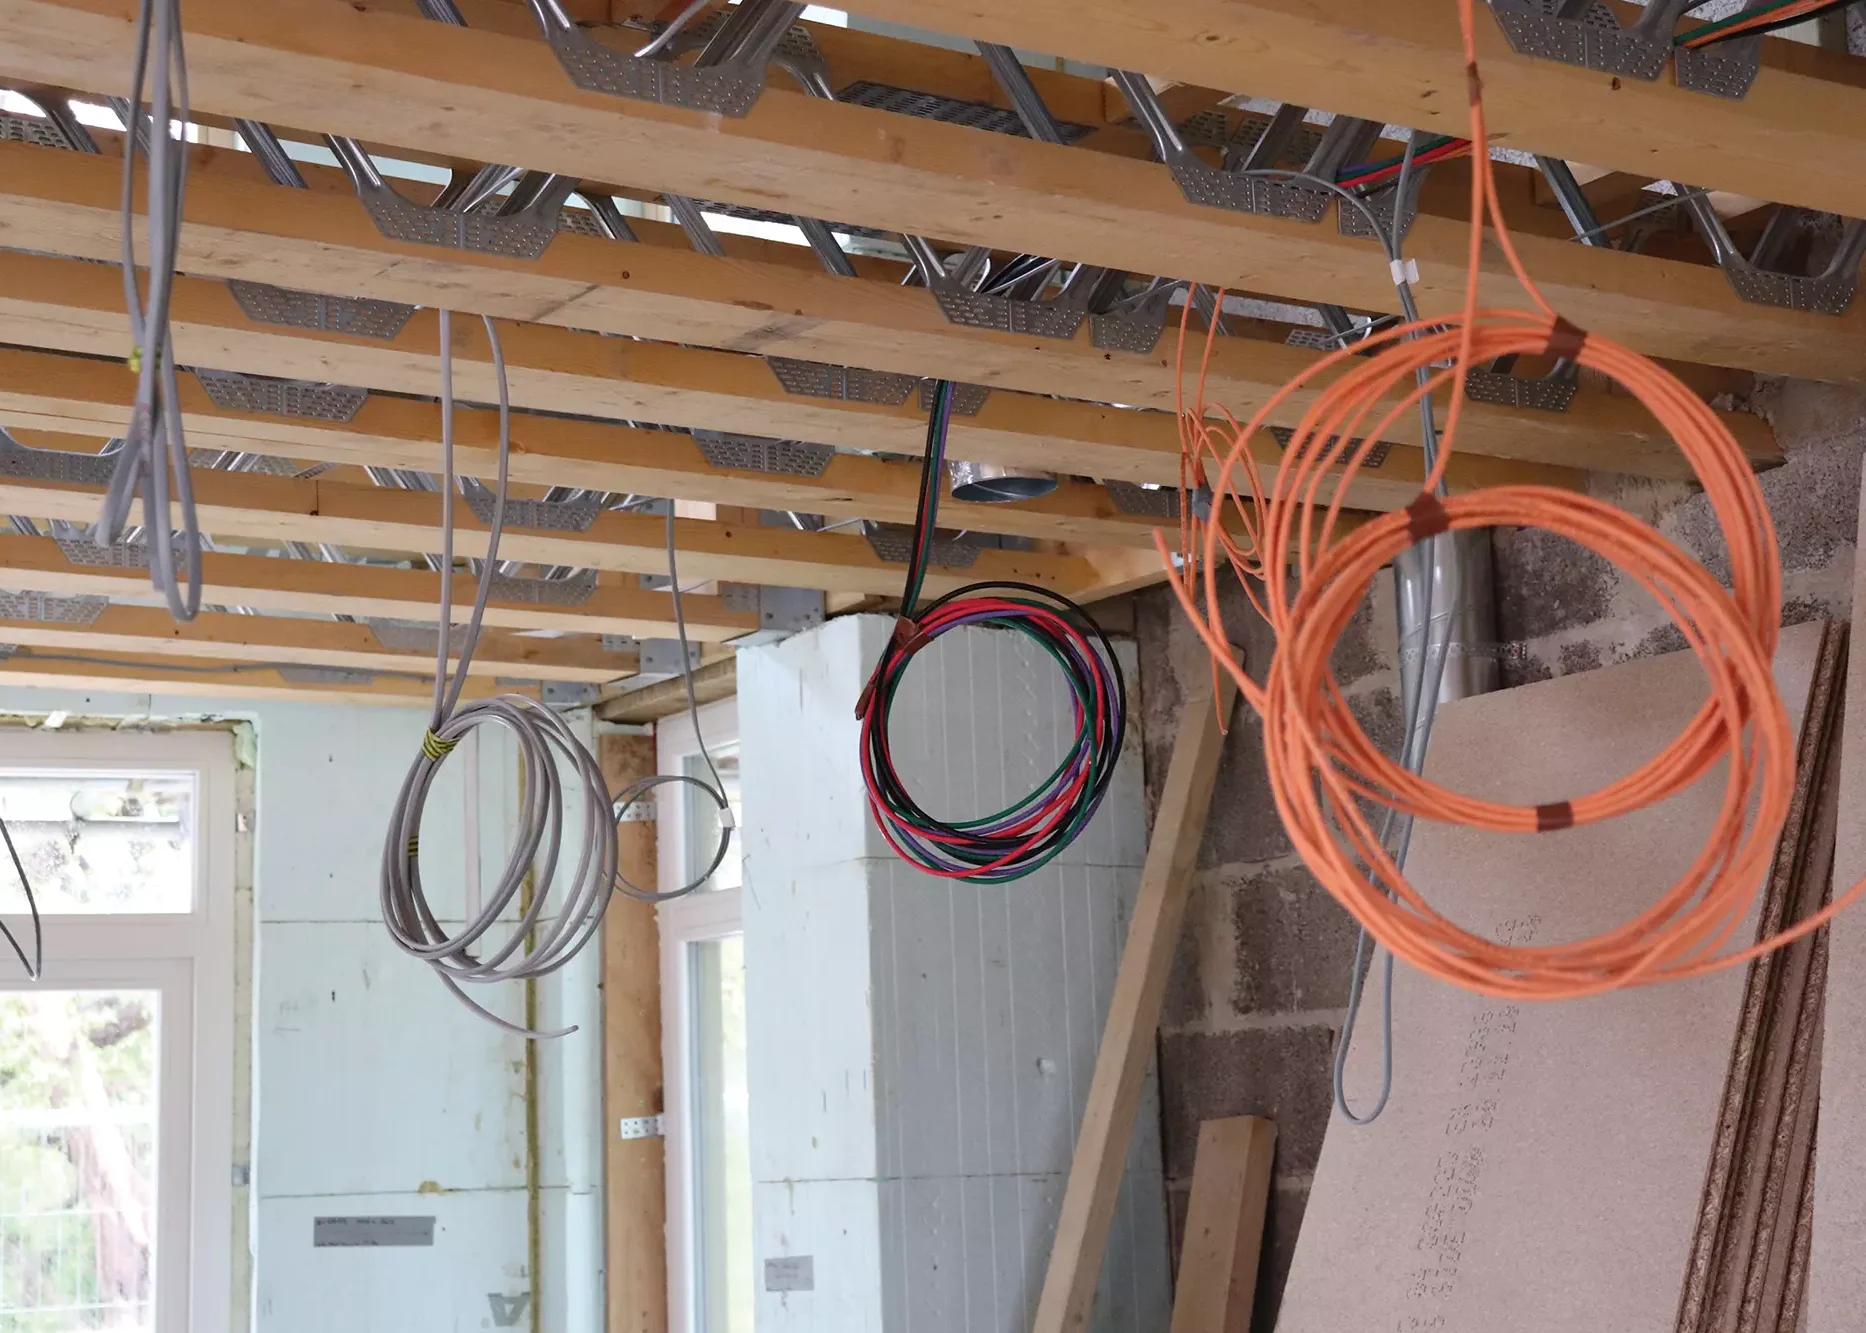
Opting for open joists, such as these metal-web versions, will give your plumber, electrician and other installers maximum access to install cabling, pipes and ducting – speeding up the work
Adding weight to the roof by installing the covering over the felt and battens is important in helping the building to settle, particularly with timber frame systems, before making progress on the interior.
So, in this case, imagine that the main structure of your new dwelling is fully erected onsite, the roof tilers are just finishing their work and the scaffolding is still in position around the building’s exterior.
Who’s Involved in the First and Second Fix Building Stages?
We separate these two stages of internal fit-out because you will have multiple trades working internally who will need to make more than one planned visit over the course of your build. The most obvious ones who will separate their work in this way are the carpenter, the electrician and the plumber.
With a bit of flexibility, the carpenter is probably the only trade who could potentially work on a project from start to finish. The plumber and electrician, however, will inevitably be interrupted by some ongoing works from the carpenter and intervention of the internal wet trades (ie floor screeders and plasterers).
our complete guide to finding trades
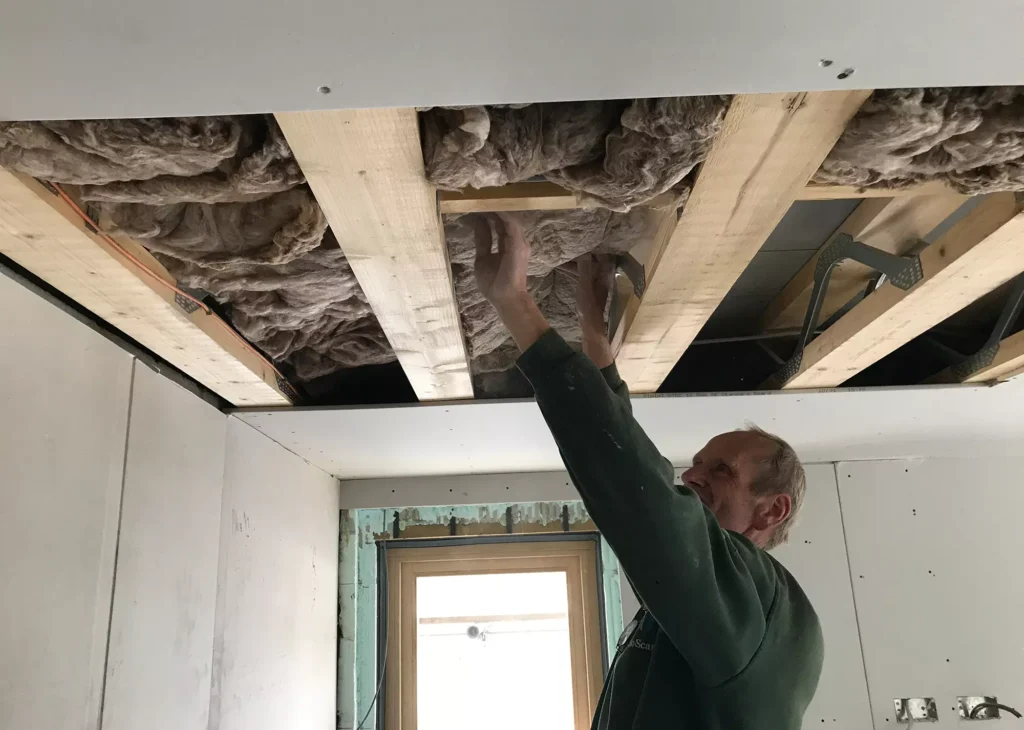
Adding acoustic insulation between storeys as the ceiling plasterboard goes up
Other site operatives who fall into the same category must divide their work between first and second fix, including home automation specialists, mechanical ventilation and heat recovery (MVHR) installers, underfloor heating (UFH) engineers and any other supplier where part of their materials are to be buried behind wall, floor or ceiling surfaces.
What Does First Fix Mean?
The first fix stage will usually be led by the carpenter, who will start laying floor boarding and installing non-load bearing internal partitions. If you’re building exclusively in masonry, then the bricklayers will have already laid their partition walls as they completed each floor level.
Regardless of the build system, once the interior layout is configured, the electrician, plumber and any other trades requiring infrastructure (such as smart home technology and MVHR) will start installing their carcassing materials.

Underfloor heating pipework should be screeded as soon as possible to protect it from damage onsite
This will include copper and plastic pipework, cabling for each circuit etc. To carry out this work, the plumber will need to have identified the planned location of incoming mains services, the boiler (or other heat source), hot water cylinder and all of the kitchen, utility and bathroom layouts.
Premium Content
Downloadable E-Guide
Where should you start when planning your home building project? Build It’s in-depth downloadable guide to self building a house contains everything you need to know to make your project a success.
find out more
The electrician should have agreed power and lighting layouts with you (including socket and switch locations) as well as the position of the incoming electrical main and the consumer units. Given the level of kit we try to cram into our properties these days, it’s well worth including a good-size plant room into your floor plan.
If space is at too much of a premium, then earmark a generous proportion of the utility room and/or the landing airing cupboard. If you are creating a plant room, then the walls in these areas should ideally be lined neatly with plywood (possibly pre-painted) so that wall fixings are straightforward and each trade has an opportunity to easily position their products with future maintenance access firmly in mind.

Affixing plywood to plant room walls creates an easy fixing point for all the kit that’s required in a modern home
If the plant is divided between utility spaces and landing cupboards, these spaces will need to be lined with finished plasterboard – but a sheet of plywood behind will make fixings easier.
This is a vital stage for robust inspection and testing, as once the walls, floors and ceilings are closed up, access to the infrastructure will be very difficult. Strategically-located access hatches, especially for plumbing waste pipes, which can sometimes prove troublesome after handover and occupation, are incredibly helpful.
At What Stage During First Fix do the Wet Trades Come in?
Once the electrician, plumber and specialist contractors have installed their carcass materials, the carpenter or plasterboard fixers will get back to work. They’ll lead on the completion of insulation installation (both thermal and acoustic), vapour control layers for airtightness, and wall/ceiling linings.
It’s at this point that the internal wet trades can get stuck in. For directly plastered blockwork, the plasters will need to install two coats to achieve the desired finish. If you’ve got for dry-lined wall surfaces using plasterboard, their work will be confined to a single skim coat (like the ceilngs).
Usually, plasterers will start at the top storey and work down. This provides an opportunity to install any screed required over underfloor heating (UFH) on the ground level. Timing is important here: the floor screed should be laid immediately after the UFH coils have been installed so there is no risk of these pipes being damaged from foot traffic.
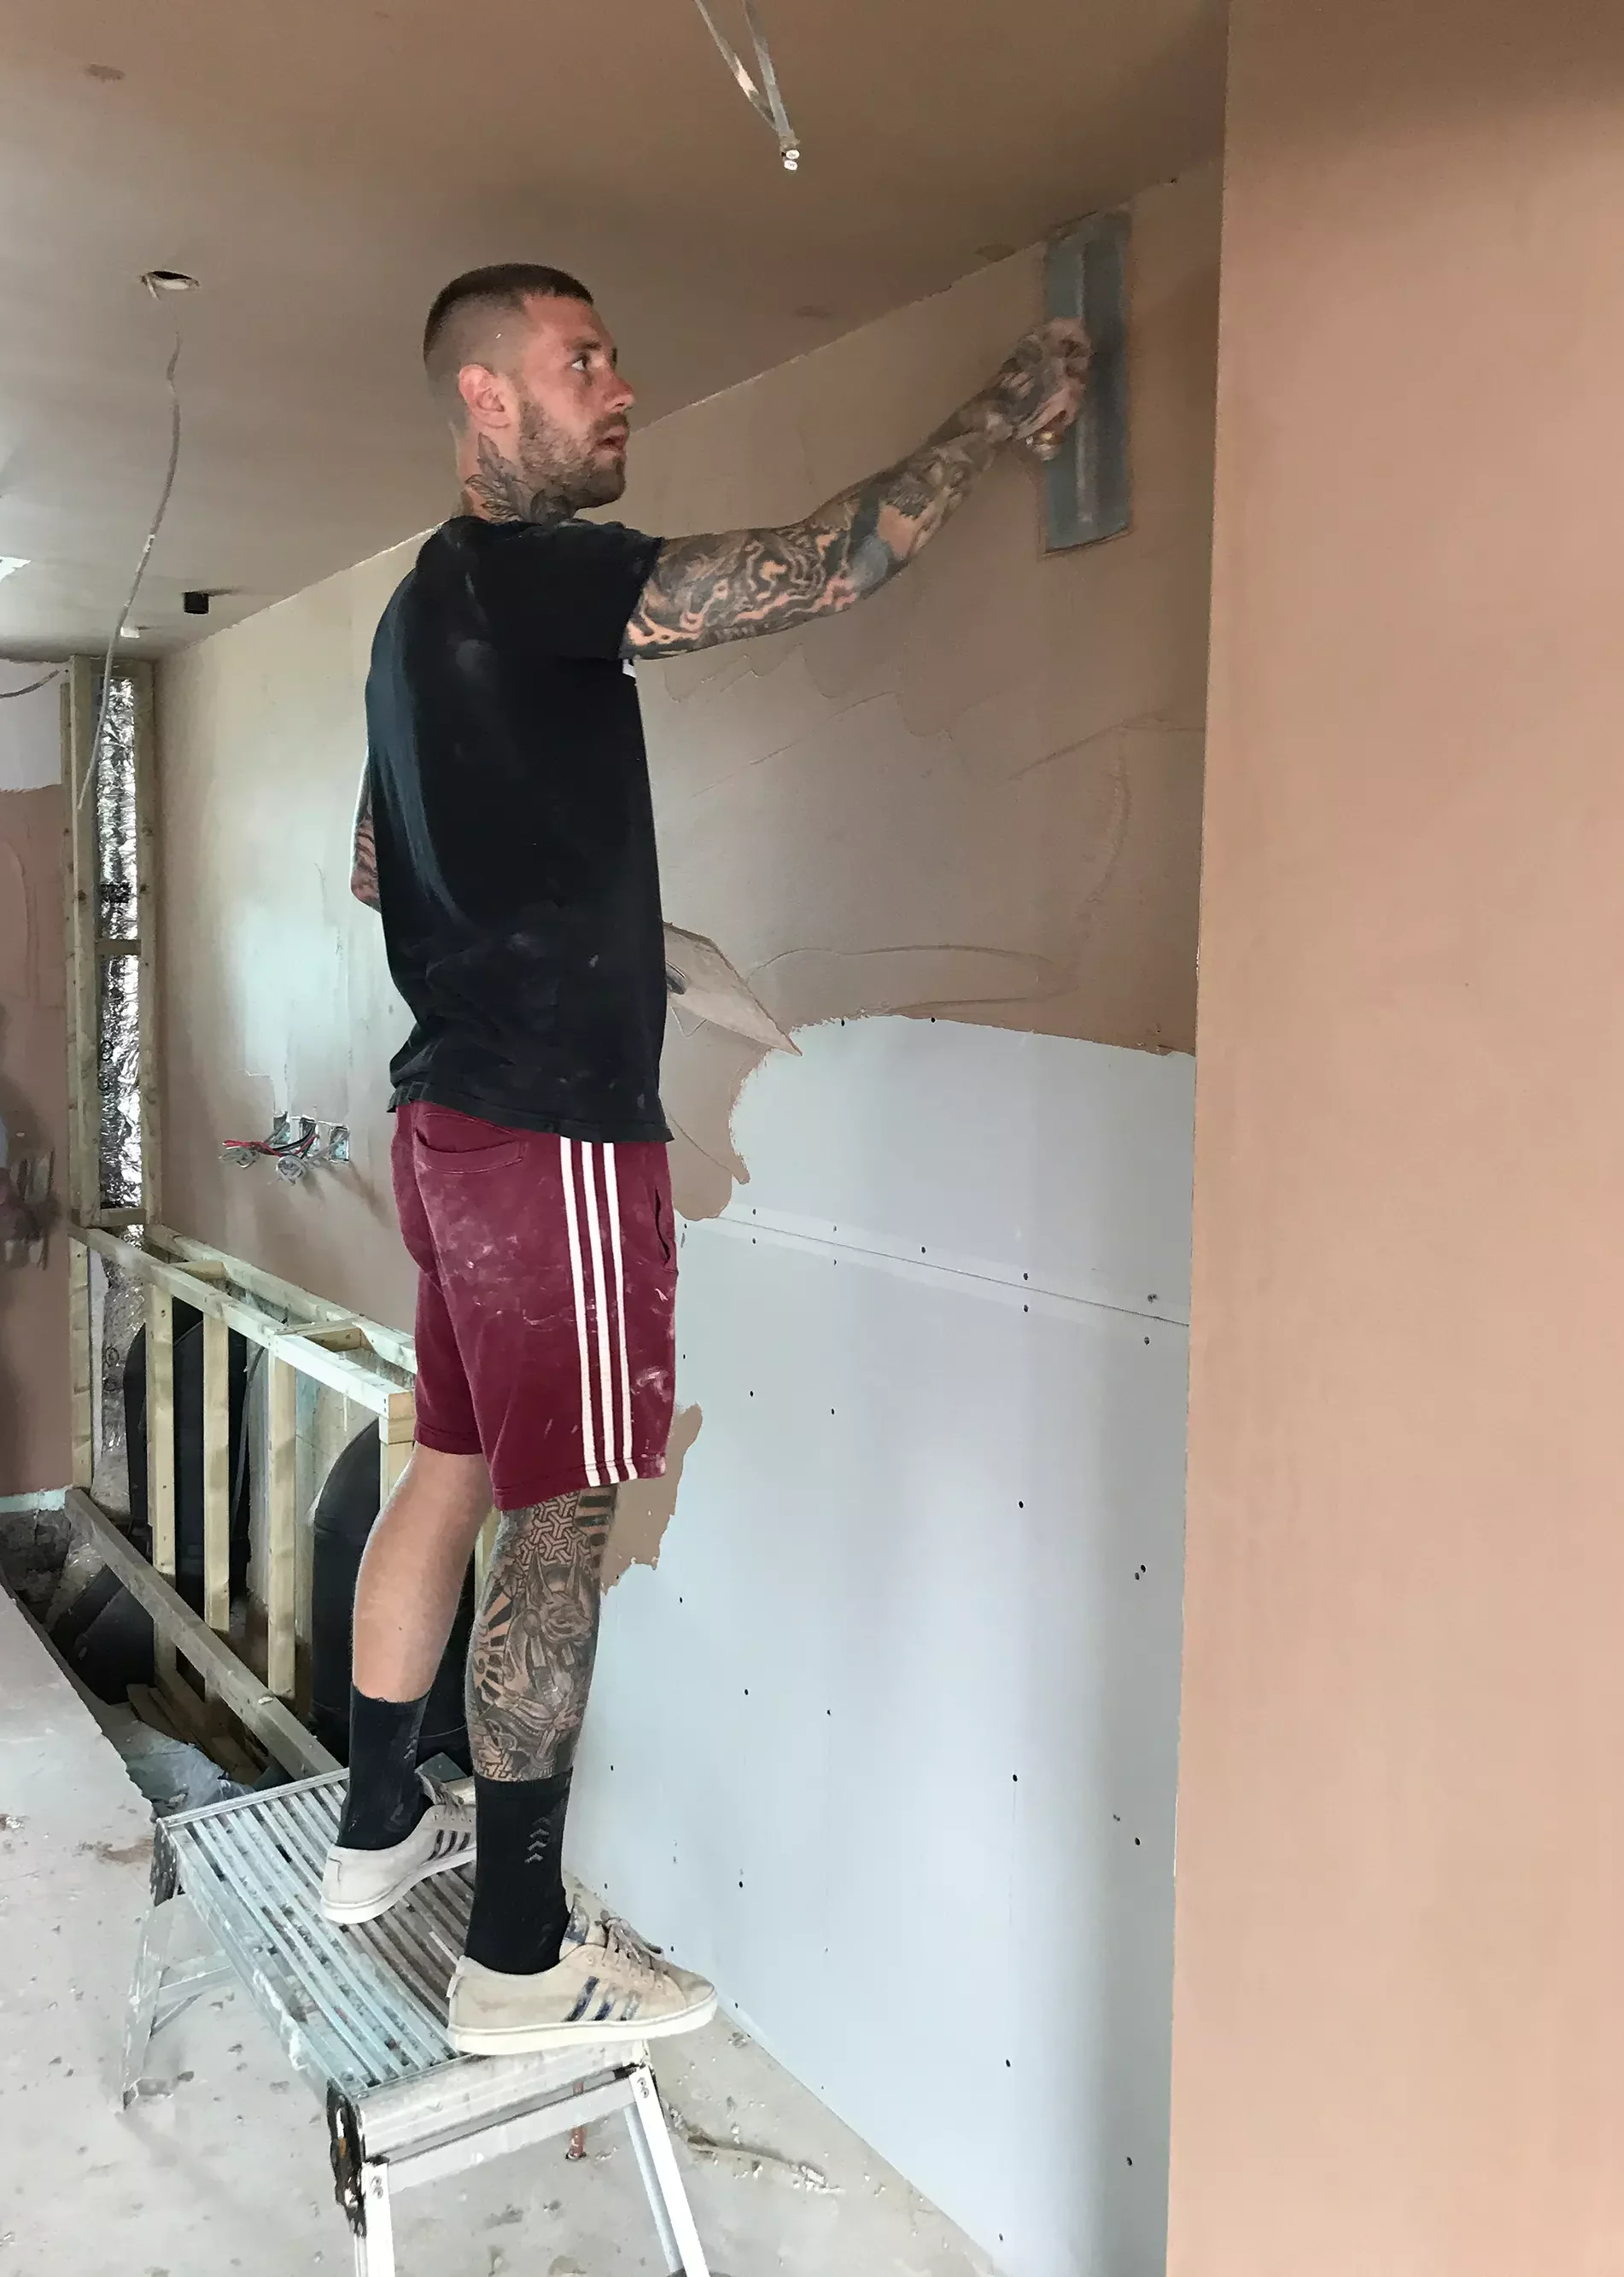
Plastering signifies the end of the first fix stage, as the wet trades get their work underway
The combination of rigid insulation, underfloor heating and floor screed at ground floor level seems to have become the default specification for the majority of self build homes, but if you’re not interested in UFH then the screed could be dispensed with in favour of a floating floor of insulation and chipboard.
The key thing about the wet trades’ work is that it is both messy and, by definition, needs a period of time to dry out. It may take four to six weeks for a standard floor screed to cure and, if you are using a two-coat plaster system then this will also need several weeks to properly dry. This will, of course, be massively influenced by the time of year and general weather conditions.
What Does Second Fix Mean?
The second fix stage is really rewarding, as this is when all of your beautiful products will be installed – including floors, internal doors, joinery mouldings, sockets and switches, sanitaryware and so forth. Therefore, throughout the second fix stage it’s important to maintain top project management to decrease the likelihood of these products being damaged.
Remember to be organised, ensuring you have plenty of tape and either polythene or other floor protection and, if it’s muddy outside, that the contractors bring different shoes to wear indoors.
What Can Go Wrong During the Second Fix Stage?
The second fix stage will be a flurry of activity with progress simultaneously being made in every room. It’s great to see everything coming together, but there will be challenges to overcome. Here are the most common:
Availability of trades: as a result of either you or your second fix contractors being delayed, they may have taken some alternative work. Contractor availability and the prioritisation of your job over others will come down to your level of persuasion, communication and coordination.
Suppliers letting you down: this can and does happen, and is perhaps most common where the company you’re dealing with has outsourced the production of components to another firm. It’s rare for a domestic construction site to operate a just-in-time delivery programme. So, if there’s space on site, getting products delivered ahead of when they’re needed – and inspecting them on arrival – can prove sensible.
Lack of time to acclimatise: some joinery items (such as solid wood floors) need to be left in their intended environment to properly adjust to the temperature To prevent shrinkage, your site will ideally be up to temperature ahead of all the second fix joinery being installed, so that products’ moisture content is good and stable as they’re being fixed.
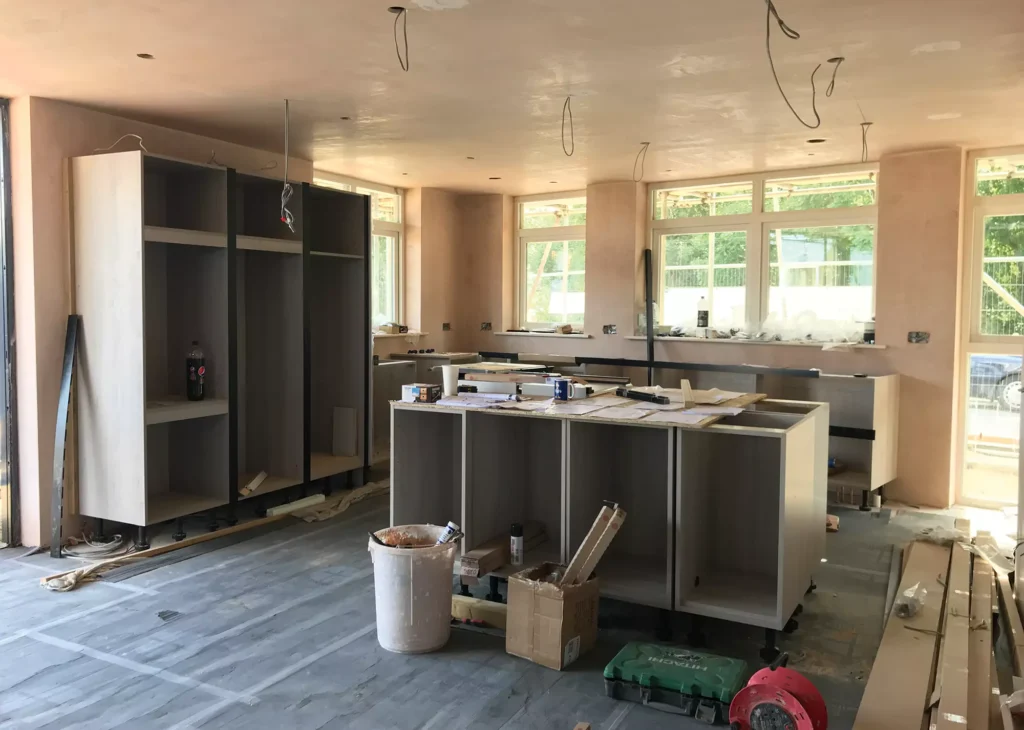
With the floor tiles in and plaster dry (note the protective covering), you can get the second fix carpentry underway.
Delays with replacements: where products have been damaged or delivered in the wrong sizes, replacements may take several weeks before being available. Whether it’s a door or a kitchen worktop, this could affect the sequence of your finishing works.
Theft: unfortunately, break-ins can result in stolen tools or materials. Good security is important right from the beginning, but never more so than when you have expensive finishing materials being delivered in the closing weeks of the programme.
The weather: by the second fix stage, the internal building environment inside the property should be warm and secure. But if you’re working in winter, prior to the heating going live, you may have difficulty in properly drying your building out following the wet trades’ work. Use heaters and dehumidifiers to keep you on track.
Last-minute changes: there are always good reasons for variations, but they will disrupt your programme and cost you in both time and budget. Where they are too frequent, you may also find that contractors can become slightly demoralised from constantly having to make changes, which could affect their work.
Utility companies: these suppliers are not generally known for their easy lead times. Their rigid requirements for quote acceptance and full payment may catch you by surprise given they’re likely to announce a three-month lead-in time from receipt of final instruction.
Don’t rush the decoration: the final trade on site apart from the cleaners and carpet/vinyl layers should be your decorator. They can make good progress by working in and amongst the other trades, but there’s a limit to this. All other contractors should be finished and off-site before their final sanding and the application of topcoats.
FAQs
How can I coordinate the different suppliers throughout the first and second fix stages?
Organising your suppliers for the first fix installation shouldn’t be too complex, as most of the materials needed will be quite generic and available from multiple merchant options. Even the ducting for specialist ventilation systems should be quite straightforward to source, while the electrician and plumber will normally organise the supply of their carcassing products themselves, as they will ultimately take responsibility for getting the specification and sizes correct.
You will, however, want to exercise a much greater level of vigilance with second fix suppliers to ensure. At this stage, any potentially lengthy lead times must be properly anticipated and planned for in your project programme – otherwise they are likely to cause significant delays to follow-on trades.
When can I get on with the exterior works, like cladding the house etc?
When crafting your project programme, bear in mind there’s plenty of useful progress that can be made externally whilst the interior first and second fix works are commencing. Indeed, you will want to get the exterior finished as quickly as you can, and the scaffold struck (removed), so that logistics around the building are much more straightforward and you can stop paying the hire charges.
The scaffolding is required for window and door installation, however, so the timing of your window delivery will ultimately affect this. The carpentry team will also need to finish fascias and soffits, along with any barge board detailing (although the primary barge and fascia boards should usually be in position prior to the roofers commencing their work).
If you’re building in timber frame then you’ll have all of your external cladding materials to complete, which could comprise brickwork, external timber cladding, render or vertical tiling in any combination. All types of building will then need the guttering fixed, any external woodwork decorated and high-level light fittings/TV aerials installed before the scaffold can be removed.
How can I find reliable trades for my self build?
Use recommendations from other partners on your build – the local merchant, key suppliers, your design team or other professionals. For instance, if you’re building a timber frame home, ask the provider whether they’ve done other projects in the area and who was used.
You can find builders online. The Federation of Master Builders’ (FMB’s) Find a Builder Service is a useful tool – enabling you to search locally by trade or job type. The FMB does some pre-vetting for you when trades join the organisation, and provides all its members with contract templates.
The Accreditus Register takes things a step further; submit your job details and their team will match you to vetted builders on the register, provide you with feedback from past customers and send a detailed quote. Accreditus also offers free background and quote comparisons, and monitors customer satisfaction on an ongoing basis.
Your guide to finding a builder
How can I identify bad trades or cowboy builders?
The best thing to do when you think you’ve found a builder, is phone them. This is better than an email, because you should get a more instant impression of the company and how it does business. Builders are very practical people – some are brilliant at the nuts and bolts of their job, but some of the older ones are not even computer literate.
When you phone them, warning signs to look out for are a long delay in responding to enquiries, an overly curt manner or a reluctance to give you a correspondence address. Ask to speak to the boss and get their name and full company details. They need to be relatively local to your site for practical reasons, but sometimes builders with a poor reputation have to look further afield where people have not heard about their shortcomings.
Ask for some examples of the projects they have completed and if there are any locally you can visit. It’s too early to ask for actual references, but they should be able to point you in the direction of some work that they are proud of. It’s also useful if you can see projects that are in progress. A chaotic-looking site is dangerous for their clients as well as their workforce and is a clue to the likely standard of their work and approach to project management.
What do follow-on trades need to know when taking on a package house shell?
A package home is a self build route where the house’s main structural shell is manufactured off-site and then delivered to your plot and erected either by your chosen trades or the supplier’s in-house team. Package homes tend to be constructed using timber frame or SIPs. “The most common questions we get are surrounding penetrations in the structure, which are easy to achieve but worth checking with us to ensure no structural elements are affected,” says Stuart Speight from Glosford SIPs.
“Other key questions involve the installation of mechanical ventilation and heat recovery systems (MVHR) and ducting runs. These are usually designed in from the start of the project, but the systems can still be accommodated later down the line, as we use posi-joists and basic steel perforations as standard. With a SIPs build there is substantially less settlement than other conventional methods, so installation of windows can occur directly after the kit completion.”
Tim Doherty


You may be interested in