- Plan ItBack
- Design ItBack
- Build ItBack
- Homes
- ProductsBack
- CostsBack
- Self Build Cost Calculator
Estimate your project costs instantly with Build It's interactive self-build cost calculator
Calculate Now - Costs & Finance
- Contracts & Warranties
- Build It Estimating Service
Get an accurate, detailed cost breakdown of your project
Submit plans
- EventsBack


 Login/register to save Article for later
Insulating Suspended Floors – Here’s How to Retrofit Insulation in Suspended Timber Floors

Wondering how you can retrofit insulation in suspended floors to minimise heat loss? Upper floors are not typically thermally insulated, as allowing heat to pass through aligns with the building’s thermal strategy. While upper floors are often sound insulated, that is a separate consideration.
To start, you need to work out what kind of ground floor you have, and whether there is any insulation already in it. First, jump up and down a few times to see if the floor sounds hollow or vibrates. If it does, you probably have a suspended timber floor. If not, it’s usually a concrete floor laid directly (on hardcore) on the ground, or a suspended concrete floor.
Next, check when your building was constructed. Floors in new buildings were required to be insulated from 1990 onwards. There will be exceptions, as some earlier dwellings had insulation built in and, equally, some after 1990 may have escaped the net.
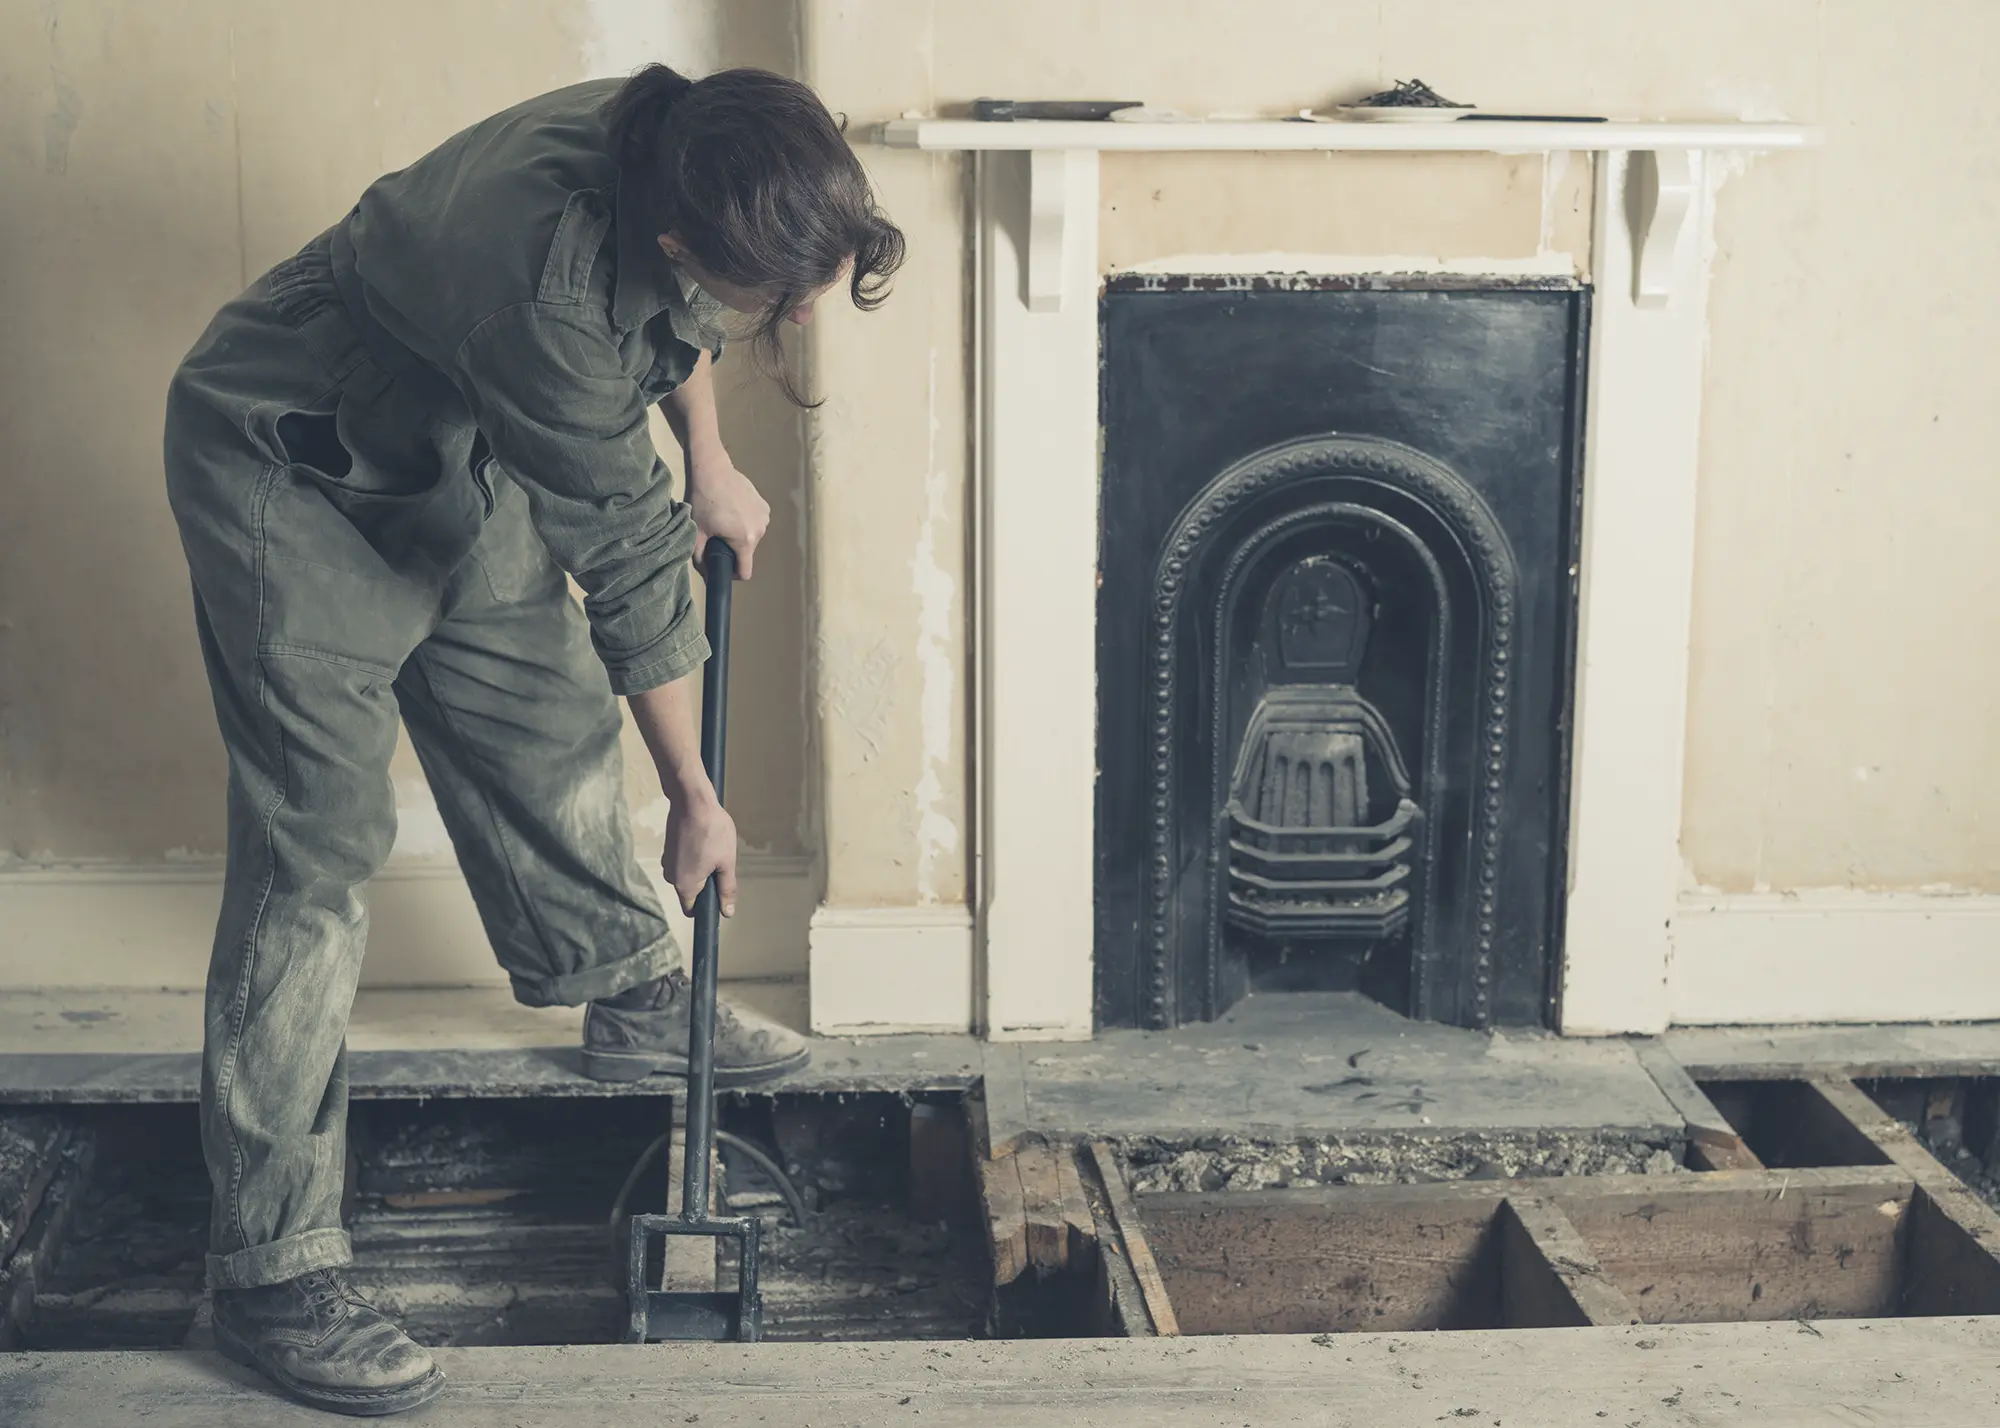
If carpeted, lift the floor covering and see if there are timber (or composite) boards below, and how these are fixed to the joists. If you have a floating timber floor, then this is going to be tricky. Note that some floors may already have been retrofitted. If records are unavailable, you may need to inspect the floor by opening it up or finding an alternative method to examine the underside.
If your home was constructed after 1990, adding more insulation is generally unnecessary. Even minimal insulation is often effective, and retrofitting floor insulation tends to be disruptive and costly. Moreover, floors are not typically a major source of heat loss in buildings.
Why Should You Insulate Existing Suspended Floors?
Suspended ground floors are a common feature in Georgian, Victorian and Edwardian houses, continuing into the 1930s and later, albeit with slight changes in construction methods. In earlier floors, boards are typically overlaid without tongue-and-groove joints – using a method that’s known as butt-jointing. Over time, these boards shrink and warp, creating gaps that can allow draughts to form.
If you want to preserve original floorboards, they’ll need to be lifted very carefully
Air leakage, rather than conductive heat loss through the building fabric, is often the primary cause of heat loss in suspended floors. However, properly installed insulation can effectively address both of these issues, improving energy efficiency and comfort, too.
Ensuring Adequate Ventilation Before Insulating Suspended Floors
It’s important to understand that sub-floor spaces were designed to be ventilated. So, before doing anything to your floor, you should first check that you have vents to the outside on at least two sides of the sub-floor zone (normally front and back in terraced housing), and that these vents are clear and unobstructed.
Inadequate ventilation (in the right position) can trap moisture in the sub-floor space, leading to decay, damp and rot in the floor joists, and – worst case scenario – the total collapse of the floor structure. If vents are missing, try and examine similar nearby houses to identify their original placement, and then reinstate them where necessary to ensure proper ventilation.
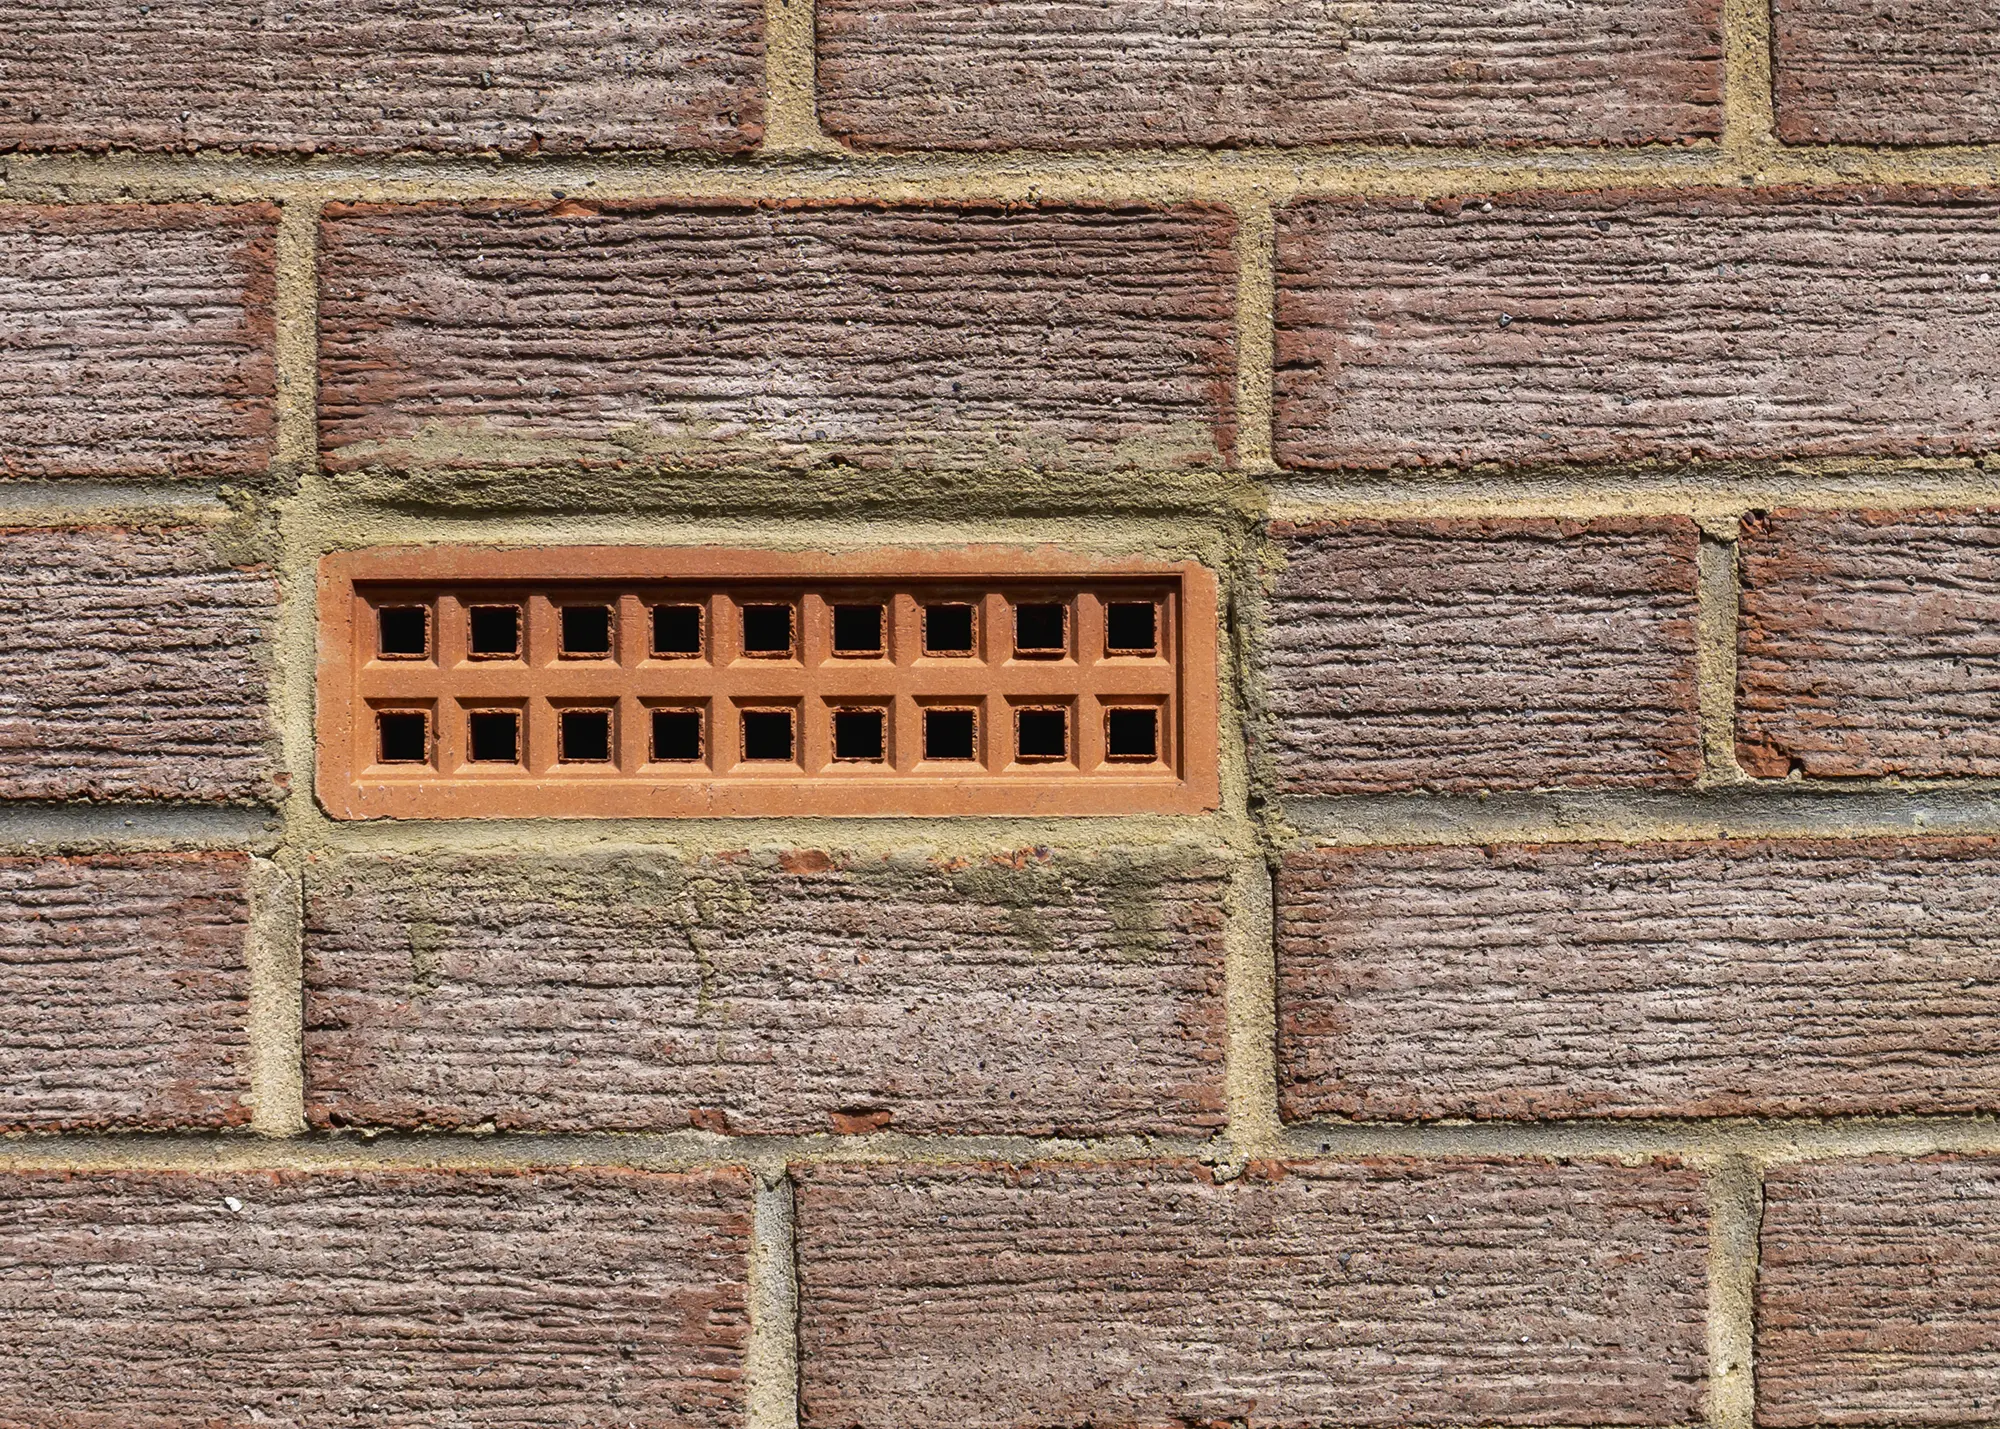
Airbricks allow air to circulate in the void beneath a suspended timber ground floor. New vents can be installed where required
If retrofitting insulation in the suspended floor is not feasible, consider replacing traditional vents with smart vents. These Wi-Fi and internet-connected, battery-powered devices can close vents when conditions permit, offering some energy savings. However, since technology and batteries can fail, it is crucial that powered vents default to the open position to prevent moisture buildup in sub-floor spaces.
Preparing Your Suspended Timber Floor for Insulation
Unless you have an unusually deep sub-floor space, or an unheated basement, insulating a suspended floor normally means lifting and removing the floorboards. Before doing that, any penetrations, such as radiator pipes, will need to be addressed.
If you intend to reuse the floorboards it’s best if they are removed by an experienced carpenter, as there are ways of doing this with minimal damage. Usually the boards will be butt-jointed rather than tongue and groove, so the main challenge is dealing with the floor brads or nails used to fix the boards to the joists.
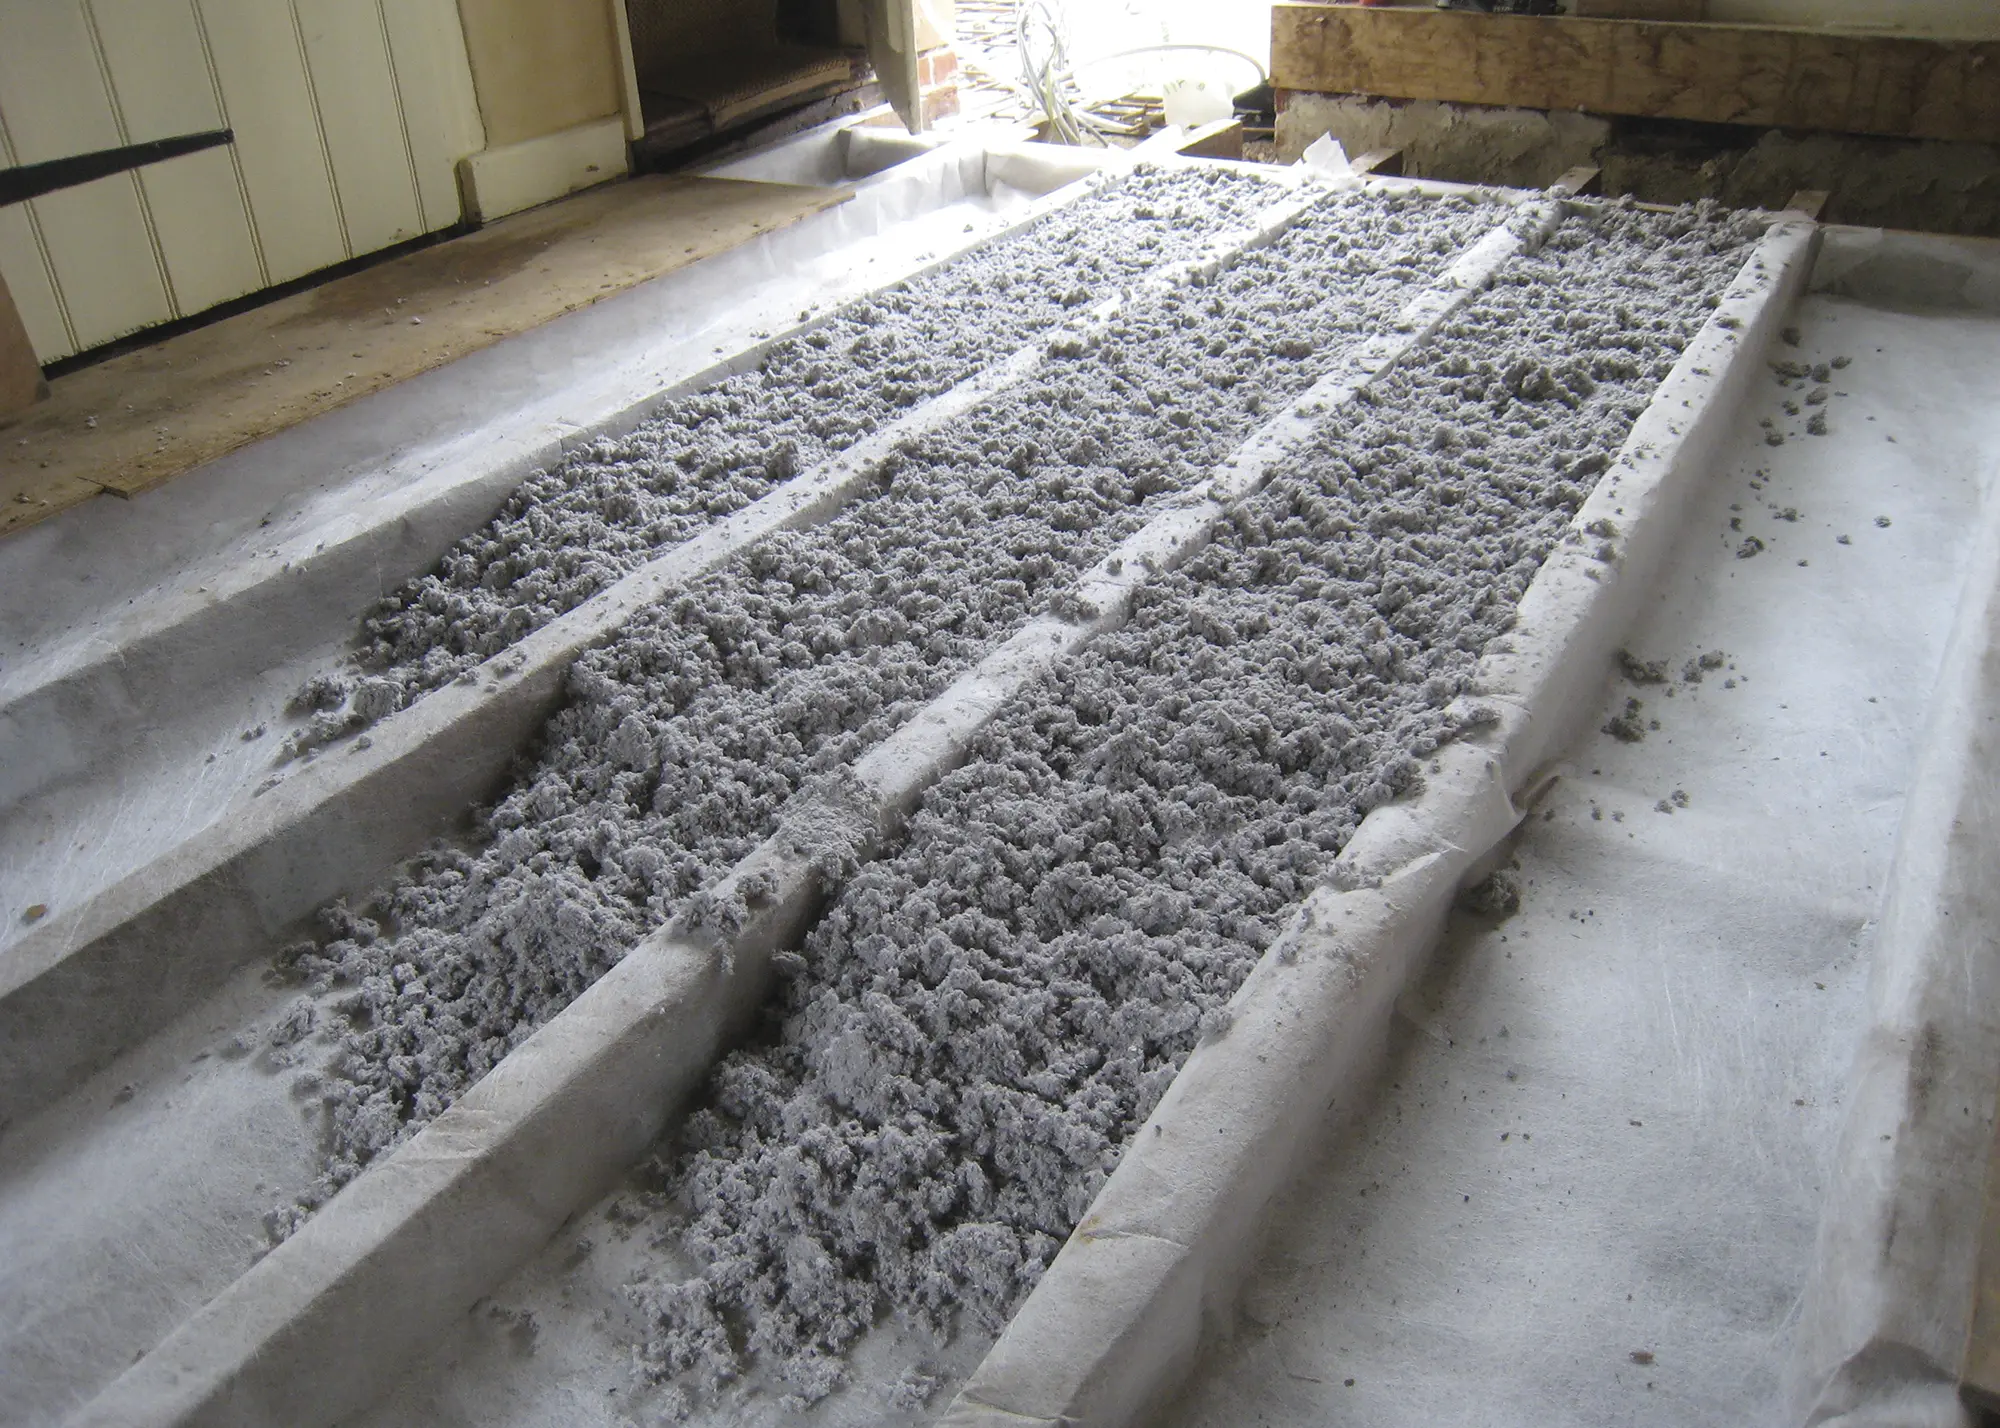
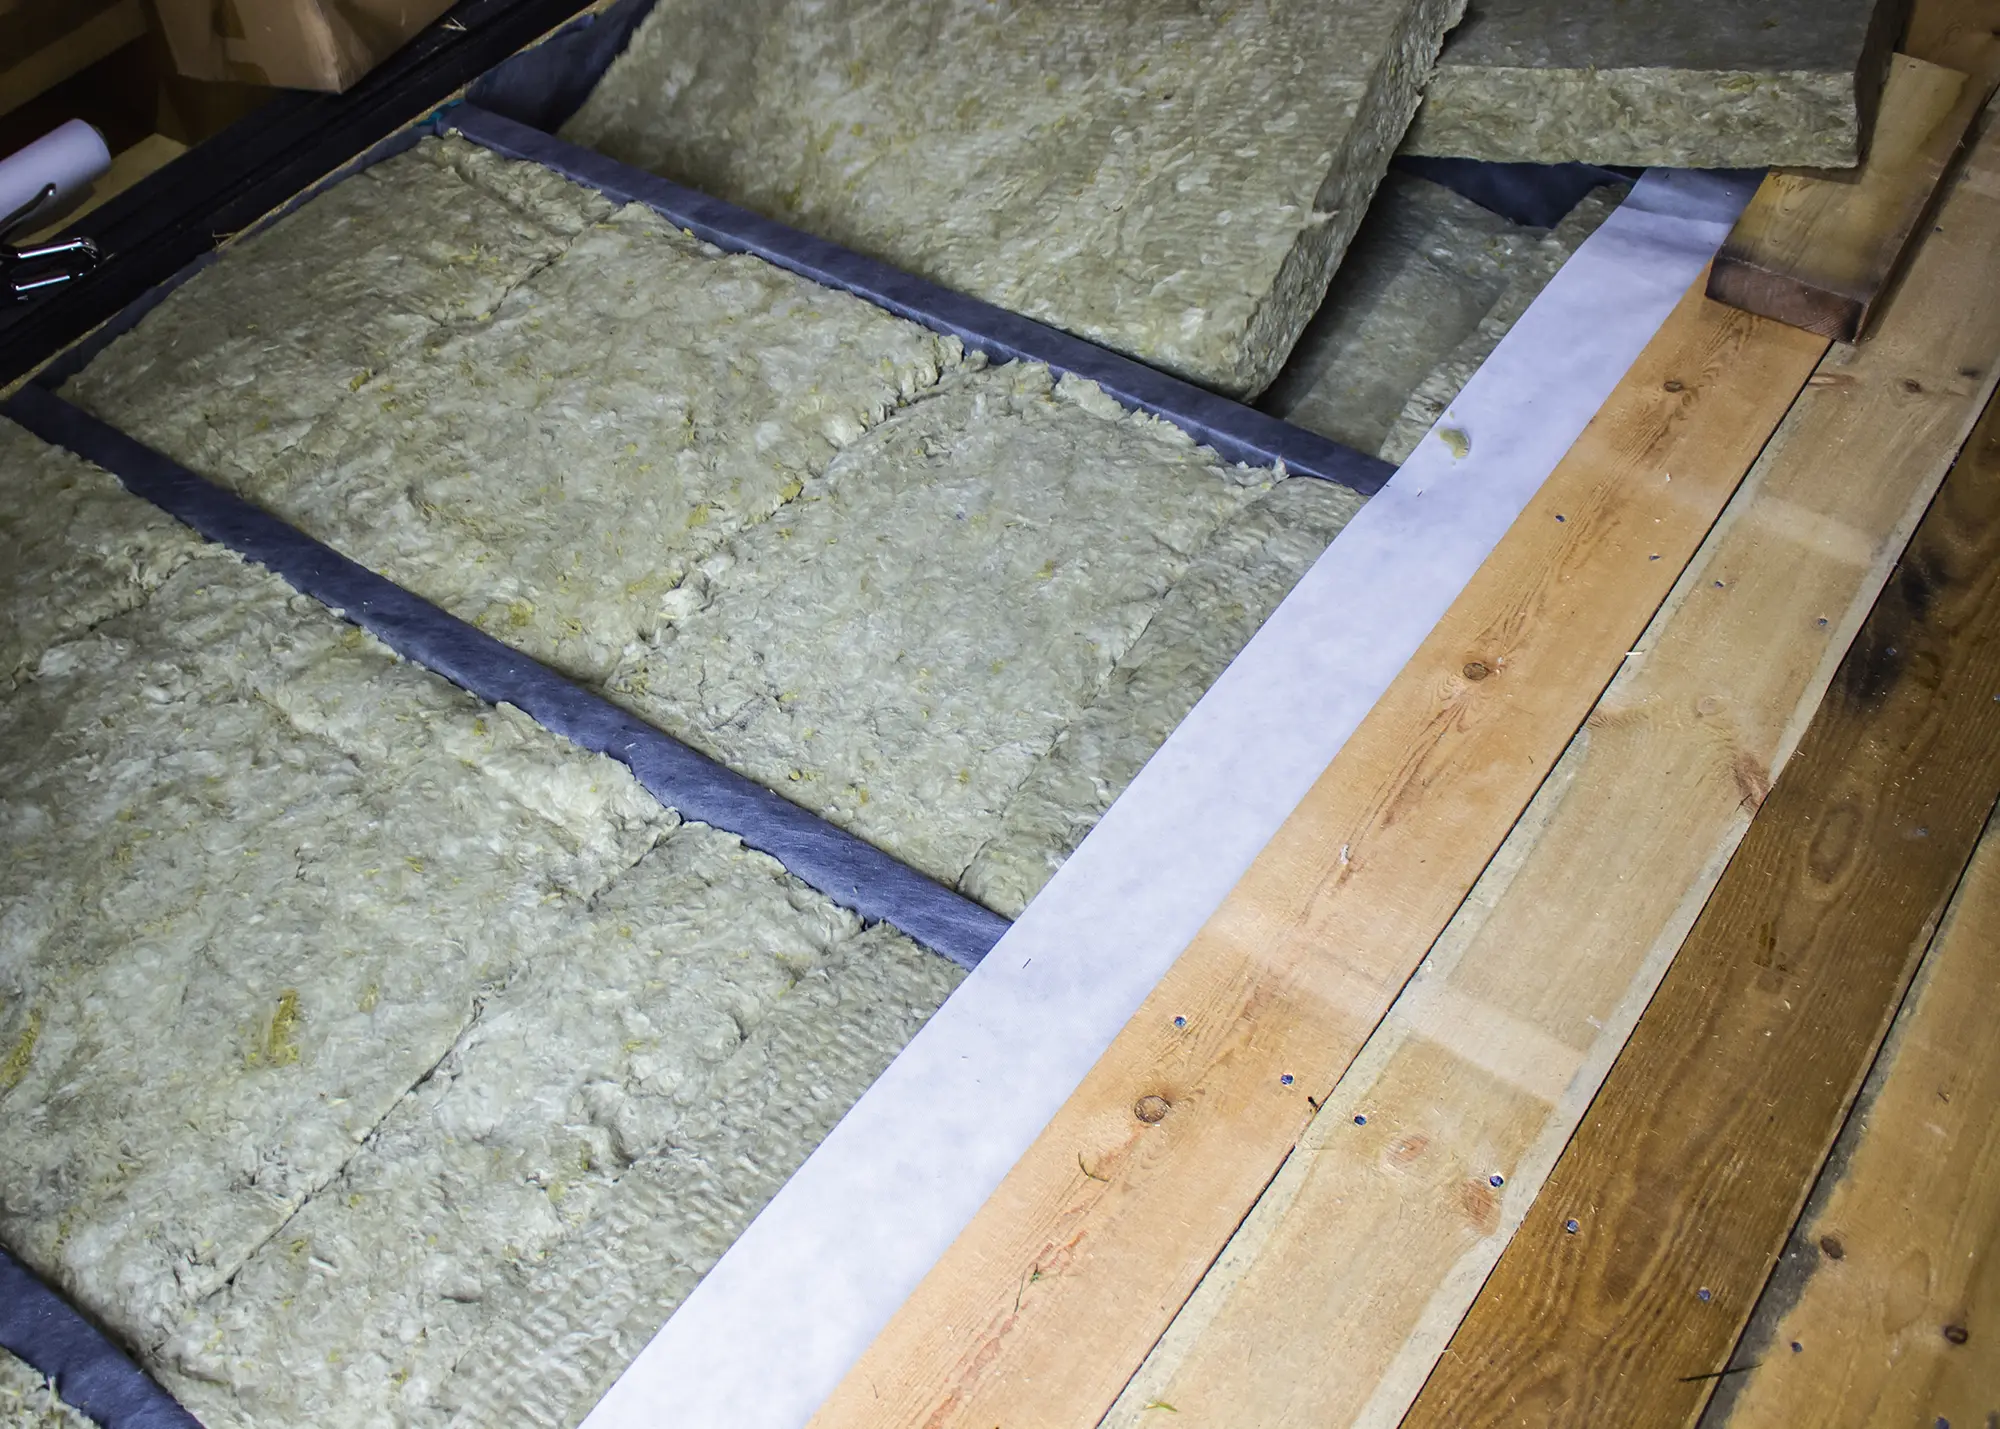
A membrane should be draped between the joists to hold the insulation and provide a windtight barrier. This install uses recycled cellulose insulation
Once the boards are removed, carefully check over the joist matrix, particularly at the ends where the joists rest on the supporting walls, as these are the points where rot most often occurs. Address the source of moisture and replace any damaged elements.
If you are considering taking on the job yourself, there are a number of health and safety considerations that you will need to address, including electrical services, radon gas, etc. You need to know where the fuseboard and all the relevant stop valves are located, and suitable personal protective equipment (PPE) should be worn. The health and safety requirements are set out in detail in the government’s document ‘Insulating suspended timber floors: best practice’.
CLOSER LOOK Improving airtightnessPreventing draughts is one of the most critical aspects of retrofitting suspended floor insulation. The membranes described in the article will address most air leakage, but achieving a super-airtight result requires a few additional steps. For optimal airtightness, seal all overlaps and joints in the membrane, as well as any penetrations for pipes or cables. Some opt to install an additional membrane layer over the joists for extra protection.
Above: Floorboards have been lifted and replaced to enable the installation of mineral wool insulation in this project. An additional vapour control membrane, placed on the warm side of the boards, improves airtightness while minimising the risk of interstitial condensation However, the floor-wall junction remains a common weak point. Addressing this effectively involves returning the airtightness membrane up the wall, but this requires removing skirting boards, which can be challenging to complete without causing damage. When it comes to sealing floor-to-wall junctions, for carpeted floors, tuck the covering under the skirting board for added insulation. For hard floor finishes, try using a moulding with a gasket underneath to cover and seal any gaps. |
Specifying Insulation Materials & the Amount Required
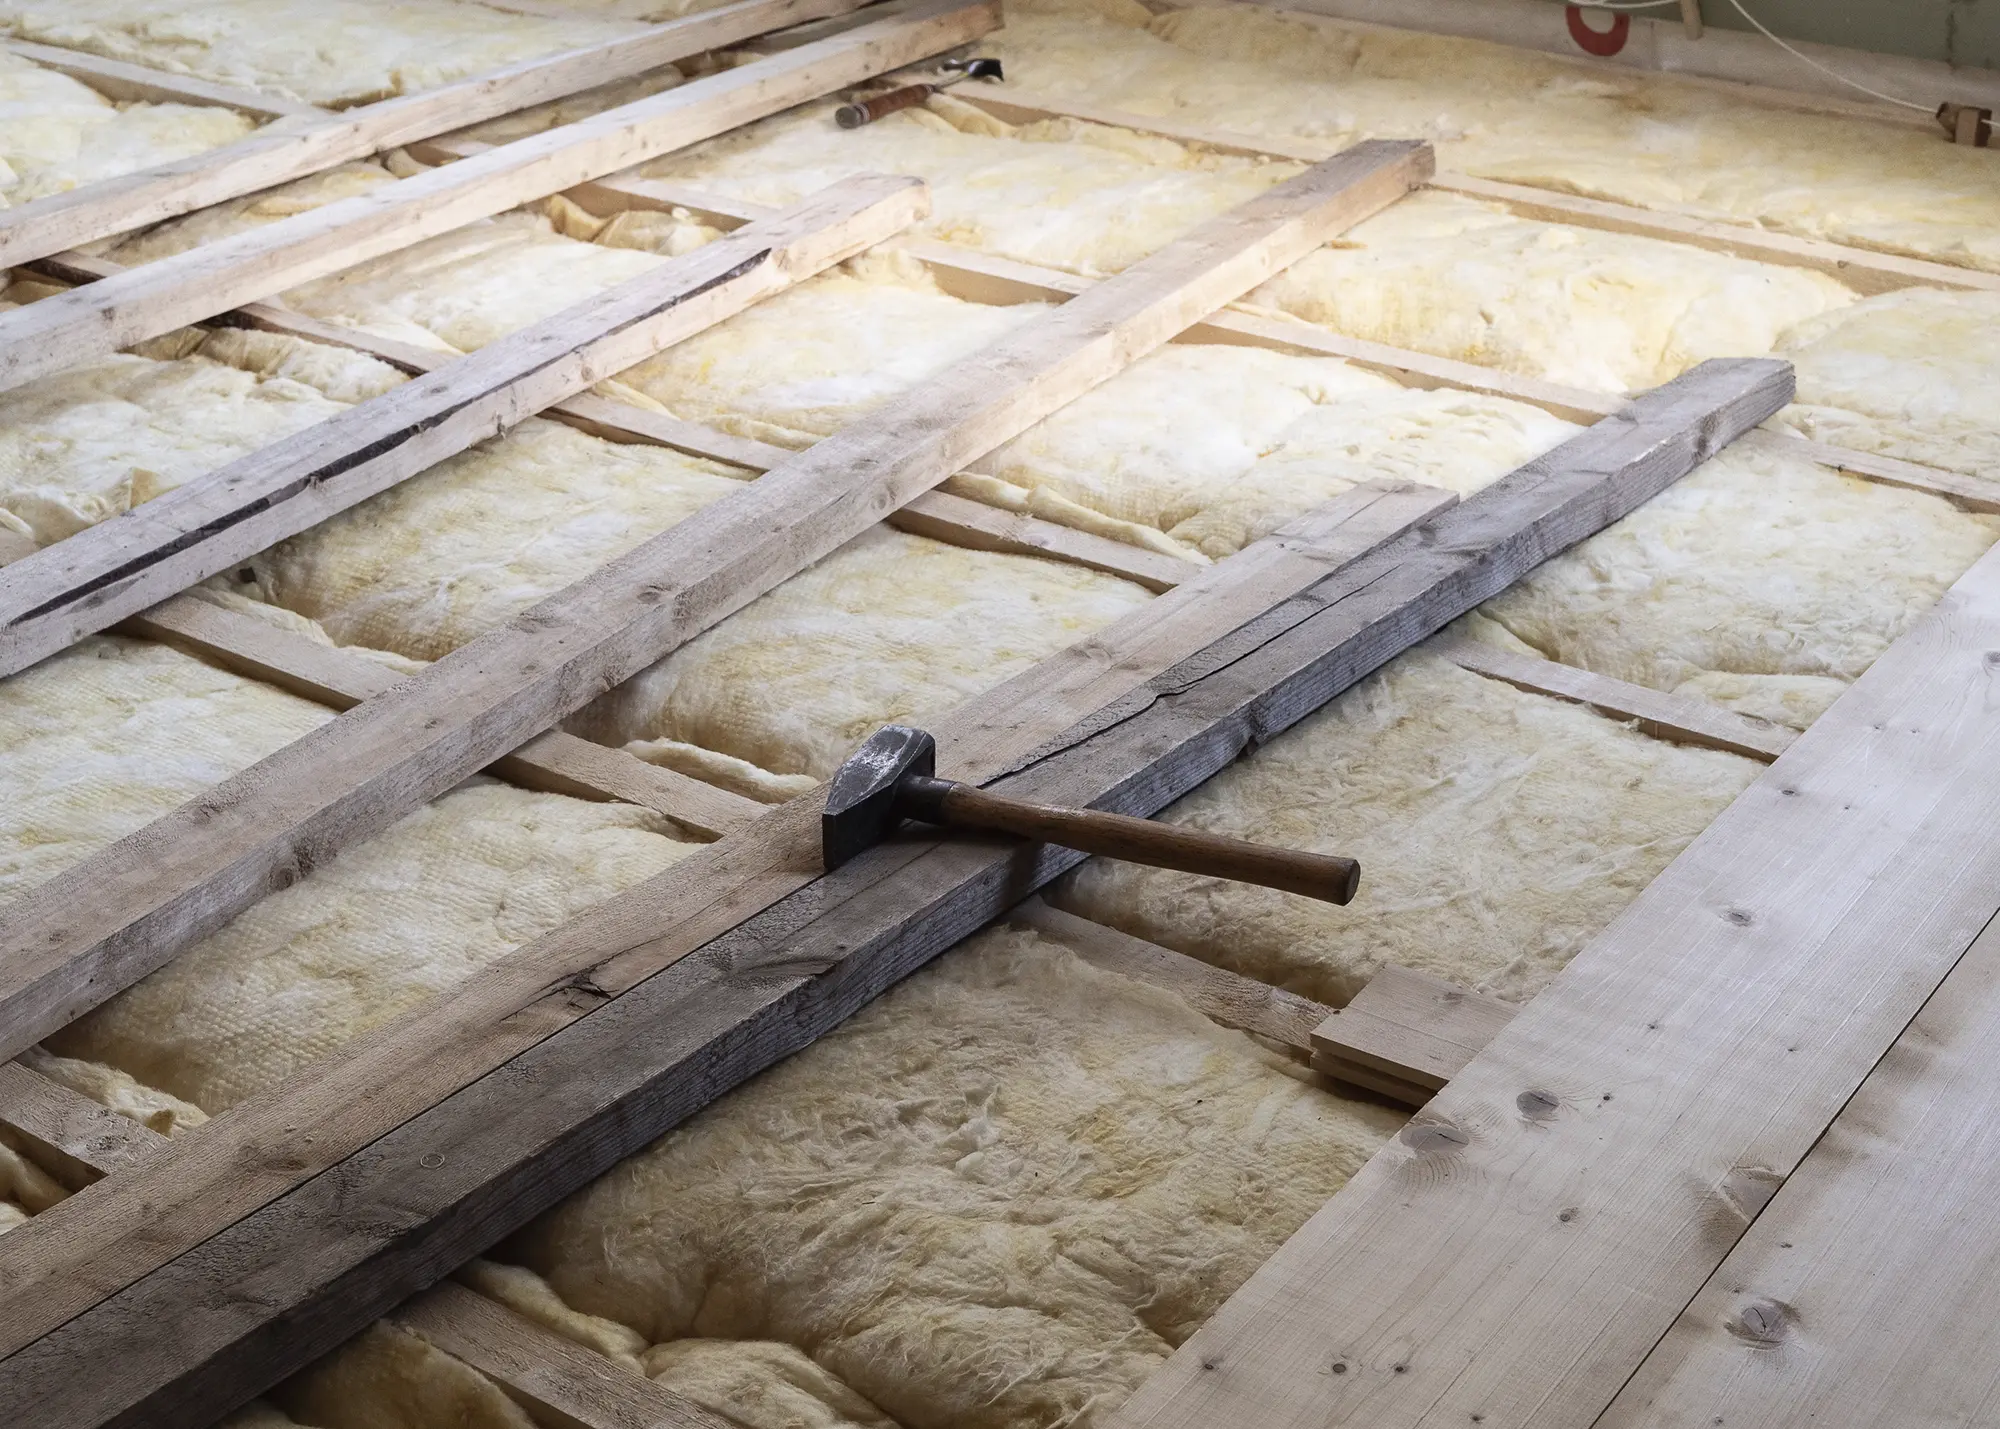
Insulation for suspended timber floors is typically installed between the floor joists, with mineral wool batts being the preferred material. Mineral wool is cost-effective, easy to fit snugly due to its compressibility, it is breathable, which to allows vapor passage, and inert, making it fireproof and resistant to moisture. Plus, it avoids the use of plastics.
There are other insulation materials available (slightly greener, but usually more expensive), which might offer advantages in some circumstances, but mineral wool is a safe bet for this particular purpose. Mineral wool batts are not the same as loose rolls of glass fibre, which you may have used to protect your loft. Instead, they are semi-rigid blocks that can be cut to fit with a sharp knife, or even a saw. A good tip is to cut 10mm larger to allow for slight compression and ensure a tight fit.
If your floor joists are deeper than 150mm, then there is little point adding further insulation, so set the support at this depth. If your joists are less than 150mm, just fill the void (don’t go any deeper). Whatever thickness you use (100-150mm), fit the insulation so it is level with the tops of the joists, to prevent air gap/circulation between the insulation and the boards. At the same time, it’s best to avoid laying anything above the joist level (slight compression by the boards is fine).
Insulating Suspended Floors – How to Fit the Insulation
The most effective method for fitting insulation is to lay a membrane over the joists and drape it between them. This serves a dual purpose: firstly, it creates a windproof layer (although it should be vapour-open to allow moisture to escape) and, secondly, it supports the insulation as it is positioned between the joists.
Mineral wool is generally available in 400mm and 600mm widths to suit typical joist centres – but older floors don’t always conform perfectly. Here, an extra slither of insulation has been added down the sides to achieve a tight fit
For precise installation, slim battens (no more than 6mm thick) can be fixed inside the membrane at the base of the joists or at the desired lowest point of the insulation. This establishes a fixed level for the bottom of the membrane, ensuring the top of the insulation aligns with the tops of the joists. Test the fit with insulation as you go to ensure accuracy. The slim battens allow the base of the insulation to compress slightly, preventing it from catching as it settles into place. A breathable vapour control membrane should be fitted on the warm side of the insulation (above the joists but below the floor deck) for airtightness.
At the floor’s edges, there is often a small gap between the wall and the nearest joist. Depending on the gap’s width size, this can be filled with mineral wool insulation from a roll, which is thinner and easier to manipulate in tight spaces.
Nigel Griffiths


You may be interested in