- Plan ItBack
- Design ItBack
- Build ItBack
- Homes
- Products
- CostsBack
- Self Build Cost Calculator
Estimate your project costs instantly with Build It's interactive self-build cost calculator
Calculate Now - Costs & Finance
- Contracts & Warranties
- Build It Estimating Service
Get an accurate, detailed cost breakdown of your project
Submit plans
- EventsBack


 Login/register to save Article for later

Looking to give an existing kitchen a makeover that won’t break the bank? From re-finishing existing cupboard doors to updating splashbacks, there’s plenty you can do to revamp the look of the hub of your home.
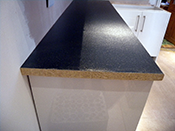
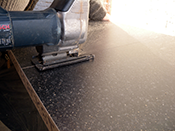
One of the most visually striking changes you can make is to fit a new worktop. Switching between light and dark finishes or opting for a new material will set the tone for the rest of the room.
Our guide is intended for laminate worktops, but many of the steps apply equally to solid timber surfaces. These are also best joined with a ‘mason’s mitre’ (the routed joint between two pieces of worktop) to achieve an attractive finish and avoid the wastage of material that would occur with a full mitre.
Both timber worktops and laminate surfaces are usually clamped together with worktop bolts – though they will also include biscuit joints to aid alignment.
Kitchen worktop project guide:
You will need |
||
|
|
|
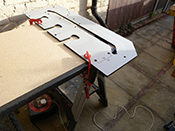
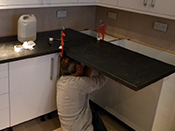
 Step 1:
Start from the left of your kitchen and work clockwise around it. Measure the length of the first piece and overcut it by at least 70mm (use a jigsaw) to allow for a 20mm overhang and an extra 50mm for routing
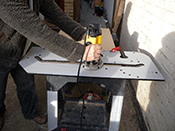
 Step 2:
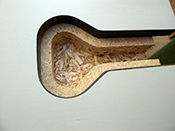
Measure and cut the second piece of worktop to length, again leaving at least 70mm extra. You will need to make a male mitre cut into the end of this piece, using a template jig and router fitted with a straight bit
 Step 3:
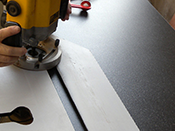
Place the second piece onto your trestles with the laminate face down. Clamp the worktop template into the the male mitre position (this varies depending on the make). Check the clamps don’t block the router
 Step 4:
Place the router on the template. Set the depth of cut to no more than 10mm and make one full cutting pass. Let the blade stop spinning before removing the router. Lower the blade by up to 10mm and repeat to full depth
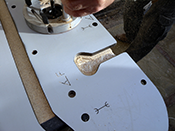 Step 5:
On the same edge as the previous cut, set the template up to produce the bolt hole fixings. As before, cut down in increments of up to 10mm – but this time stop once you’ve reached halfway down
 Step 6:
Place the mitred piece of worktop onto the base units, with the mitre against the first piece. Mark the bolt hole positions underneath. Use masking tape, a pencil and square to mark the depth and starting point of the female mitre
 Step 7:
Place the first piece of worktop onto the trestles with the laminate facing up. Use the template’s female peg holes to position the jig and then cut the female mitre using the same incremental process as in step four
 Step 8:
Cut the bolt holes into this stretch of worktop, ensuring they will line up with their counterparts. Use you router reduce the overhang to about 20mm – this gives a much cleaner cut than a jigsaw or handsaw
 Step 9:
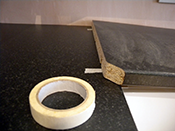
Place the two mitred pieces together on the base units and check they fit properly. Cut strips of laminate edging slightly longer than the worktop edges and apply contact adhesive to the backing and the open face
 Step 10:
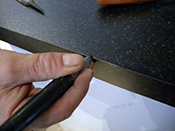
When the adhesive is touch dry, attach the edging strip with a slight overhang all round. Lightly tap with the face of a hammer to flatten. File excess laminate with a gentle upward motion and age the join with a felt tip
 Step 11:
Pull the worktop away from the wall. Put some masking tape around one end of the fixing bolts to prevent them spinning, before running some colour-fill joint sealant around the edge that’s to be joined
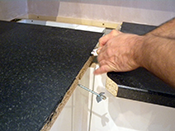
 Step 12:
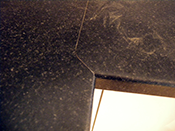
Push the worktops together and clamp. Use a spanner to tighten the bolts from below. Scrape off excess sealant and wipe down with acetone on a cloth. Remove the clamps and screw into place with fixing brackets
This step by step guide is supplied courtesy of TradesSupermarket