Estimate your project costs instantly with Build It's interactive self-build cost calculator
Calculate NowGet an accurate, detailed cost breakdown of your project
Submit plans

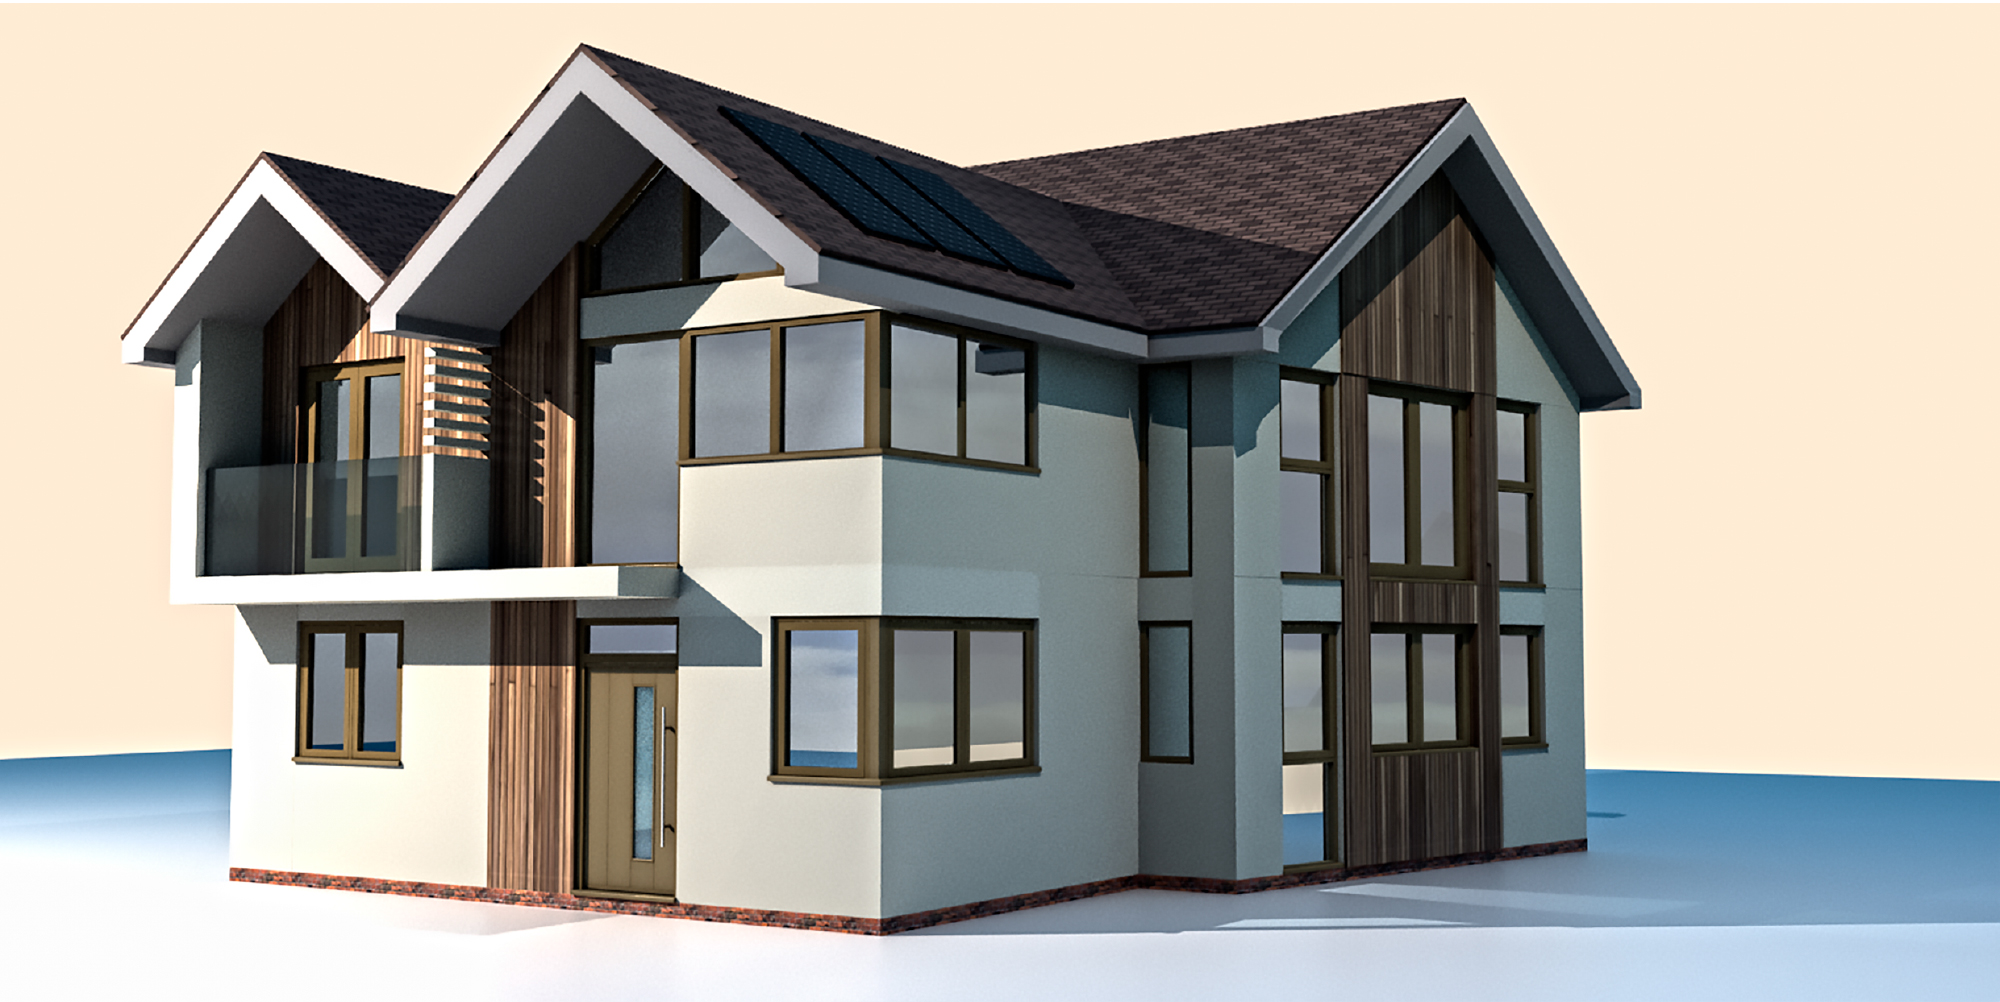
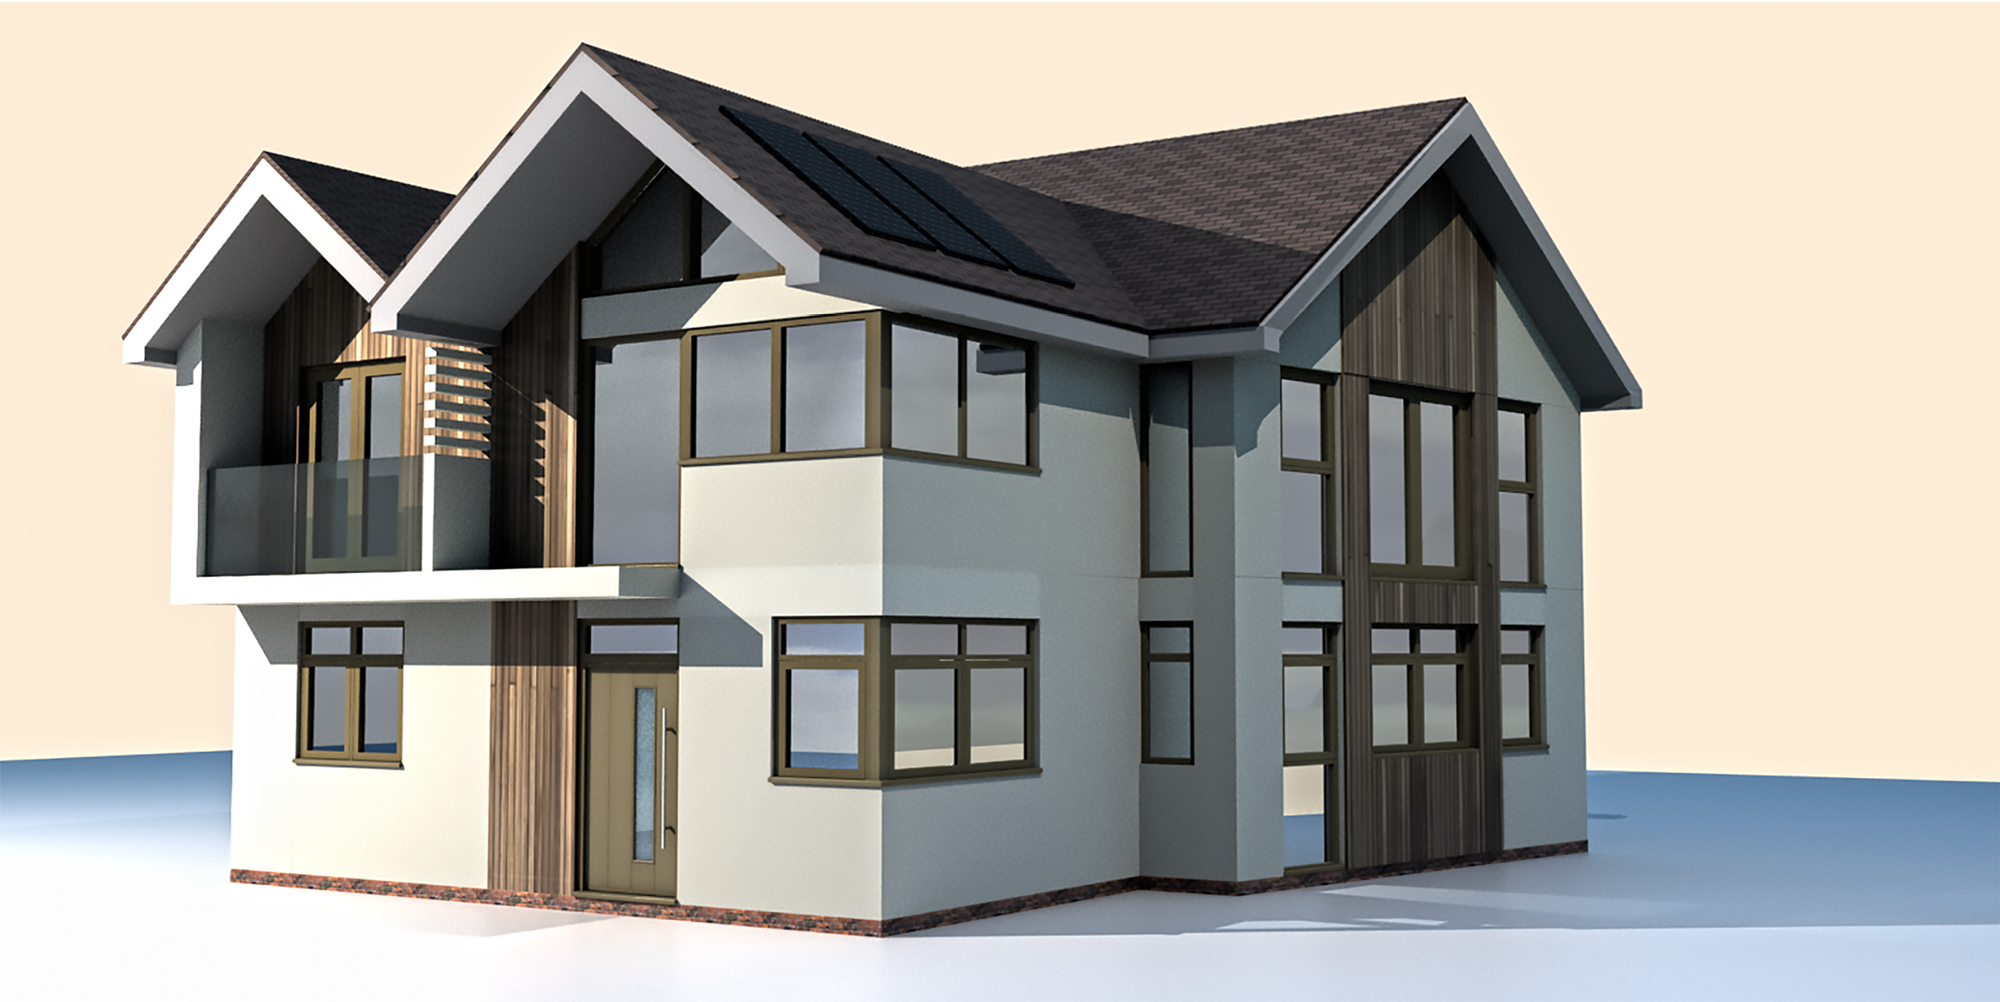
With the Build It Education House, we want to show that you can get real wow factor on a relatively standard self build budget. To achieve that, we’re including some finely-tuned statement features that give us plenty of bang for our buck.
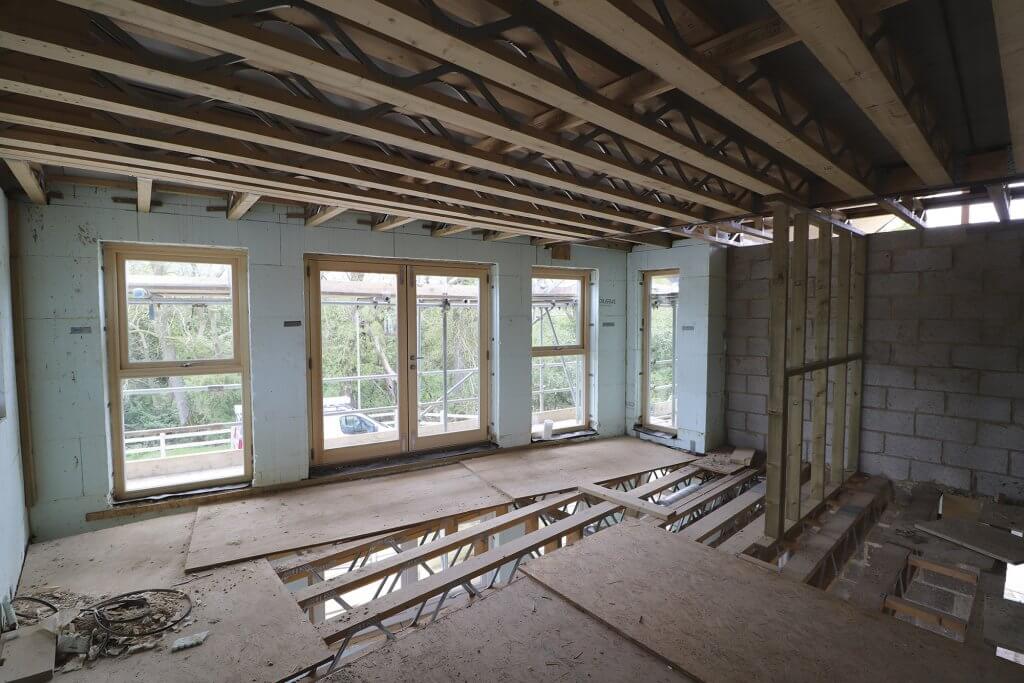
One of the most important areas to get right is the fenestration. Windows make a huge contribution to the finished look of a house. The Build It House design includes a stunning glazed apex at the front, complete with wraparound corner. So we’ve worked closely with our architect and glazing supplier to get the best results.
When it came to selecting a window partner for our self build, Kloeber’s reputation for great customer service was a big factor.
We’ve chosen them to supply and install the windows, French doors and fixed glazing for the Build It Education House. They’ll also fit a FunkyFront door for the main entrance. We’re appointing other partners for elements such as the rear sliders and rooflights (more on these in a future instalment).
Read more: Advice & ideas for your window installation from Kloeber
The window specification developed over the course of three meetings with sales director Matt Higgs, spread across several months as the Build It House design evolved.
I’ve found Matt and his team excellent to work with. They’re proactive, explain technical details in an easy-to-follow way and are willing to go the extra mile to help ensure we get the right result. Exactly the kind of service a self builder needs!
We booked in our first meeting with Kloeber well before going on site. Lapd Architects and our structural system provider, ICF Supplies, joined us for this. Much of the discussion focussed on design and practical considerations.

The design for Build It’s Self Build Education House features a significant amount of glazing, including some complex features such as the front apex. So getting the windows right will be crucial to the overall aesthetic
At this stage, we had an early window schedule – prepared by Lapd – but it needed refining to suit Kloeber’s installation requirements. In particular, we wanted to ensure everyone was on the same page about how the units would fix into the ICF walls.
Window lead times were another hot topic. Most suppliers deliver in six to eight weeks once you press the green light for the order. Typically, they prefer to measure up in situ before manufacture starts. But we were keen to specify the windows off the drawings to try to avoid down time on site – and Kloeber was happy to accommodate our request.
The only exception is the apex glazing. Both Matt Higgs and our architect Opinder Liddar (rightly, it’s fair to say) felt this was too complex to produce off-plan. So we measured this on site once the Education House roof was on.
Sequencing-wise, installing the windows is the next big job once the main roof structure is weathertight.
We’re opting for factory-painted engineered softwood frames for our windows. The external finish is three coats of microporous paint in RAL 7034 Gelb Grau (yellow-grey).
The dual-colour windows can have a different finish inside. We’ll have white for the ground floor and hallway apex glazing, with the natural character of clear-lacquered pine elsewhere upstairs.
On the upper floor, we’ve gone for the character and softness of a timber internal finish for the windows – as seen in the master bedroom
Properly-treated slow-grown softwood can deliver impressive durability. In fact, engineered formats offer a lifespan very similar to hardwood. Kloeber’s timber windows also offer better U-values than their equivalent aluminium product.
All our windows will deliver a good U-value (a measure of heat loss, where lower values are better) of 1.3 W/m2K. Working in tandem with the airtight, highly-insulated ICF superstructure, this will deliver very strong results and low long-term energy bills.
Importantly, we can achieve our performance goals using good-quality double glazing at real-world prices. There’s no need for us to buy triple glazed windows.
One area up for debate was the top lights (small panes above the main window) on the ground floor. The planning drawings show dummy sashes, but on such narrow units the frame-to-glass ratio can be a little mean.
| Browse the Gallery: How Kloeber’s 3D visualisations helped us to decide on the ground floor window style (click for larger images) |
So would direct glazing work better, or perhaps just full-height windows?
Kloeber’s design team inputted our plans into their own software to produce 3D renders showing the options.
Immediately, it was clear Opinder had been right to include ground floor top lights, as this really does add architectural interest. It was also obvious that a direct glazed version would be best to maintain good sightlines.
At our second meeting, we started to iron out the key order details. The units are in a mix of configurations – some standard casement, others top-hung – to suit their size and location.
For instance, sections of the glazing in the ground floor hallway are too heavy for a side-hung casements, so these are all top-hung for consistency. And we don’t need trickle vents because we’re fitting a mechanical ventilation and heat recovery system.
Dealing with the steel post our structural engineer had specified at the glazed corner required a joint effort between Kloeber and Lapd to minimise sightlines and preserve thermal efficiency. The solution involves rigid insulation, packing and cladding sections inside and out to match our chosen finishes.
We discussed security, too, including which windows and balcony doors would need to be designed and fabricated to PAS 24 standards (under Part Q of the Building Regs).
Any windows considered ‘easily accessible’ must be sufficiently robust to thwart a physical attack. In practice, that means providing good-quality, secure ironmongery and using laminated glass (which Kloeber specifies as standard).
Another crucial decision is the setback position (how far into the depth of the wall the window sits). There are several practical considerations here, beyond pure aesthetics.
For instance, we wanted a cill project of at least 35mm. The largest cill Kloeber does is 75mm, so that would have a bearing on the setback. We also want to make sure our renderers and plasterers can easily achieve a good finish in the window reveals (the surrounds between the window and the outer faces of the wall).
Once we’d finalised these elements, Matt and I agreed and updated the window schedule. It’s vital to get this right so everyone on the design and construction teams knows exactly what’s expected.
I met Matt over at Kloeber’s Bicester showroom to finalise the window order for the first phase.
We went through the quote line-by-line to triple-check the window and door sizes correctly corresponded with the planned structural openings. These need to be 10mm bigger all round to allow a tolerance for installation.
Matt and I also scrutinised details such as the window opening configurations, finishes and ironmongery. There were a few small details left to agree. For example, we switched to secure thumb latches on the internal side of the balcony doors, rather than keyed locks.
Build It Education House: Fitting the Windows
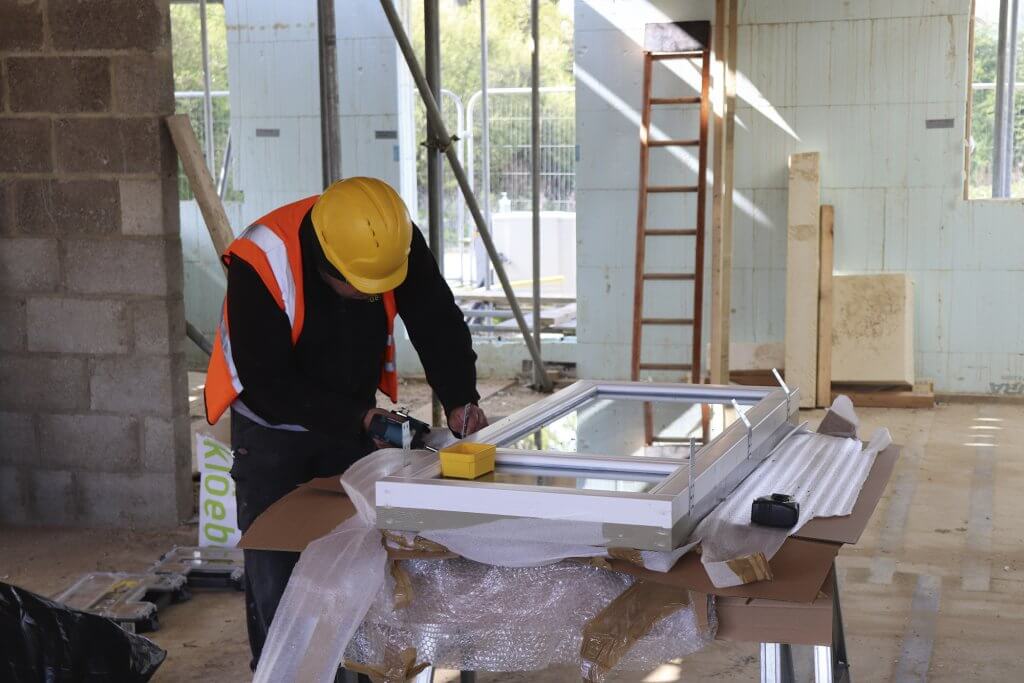
1. Prepping the ready-made framesKloeber’s softwood windows come fully factory-finished, with a five-year warranty on the durable microporous paint. Note the dual-colour: we’re going for white internally, and yellow-grey externally. So, on site, the only prep is to unwrap the windows and install the ironmongery and fixing brackets. This unit features a direct-glazed top light.
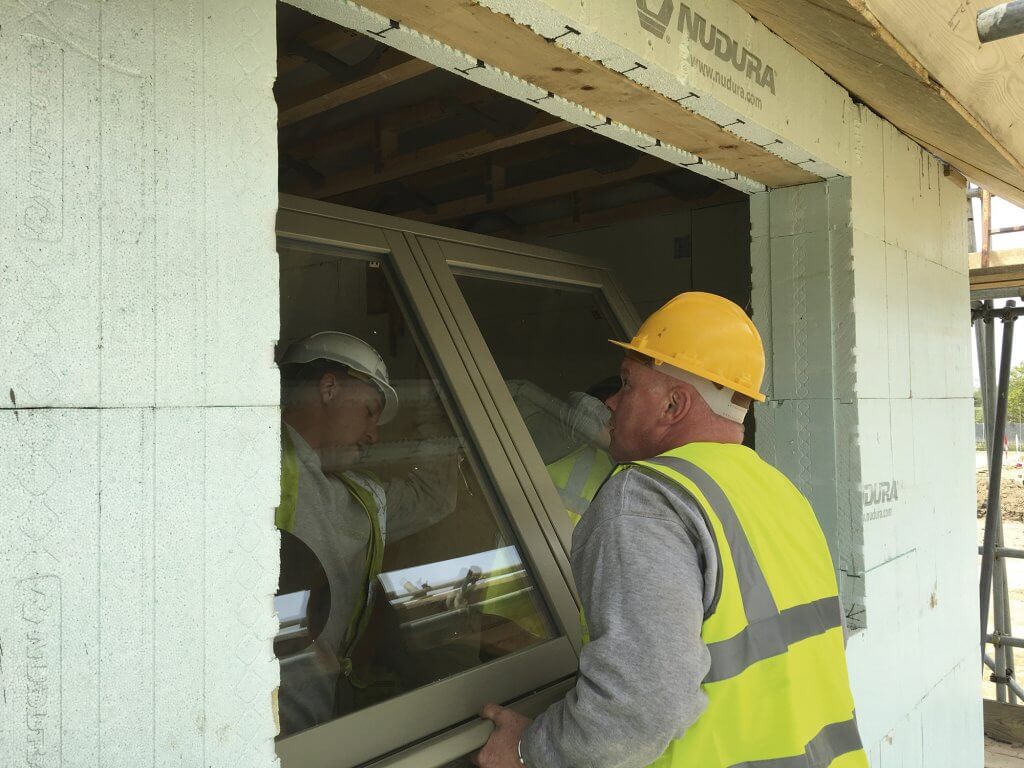
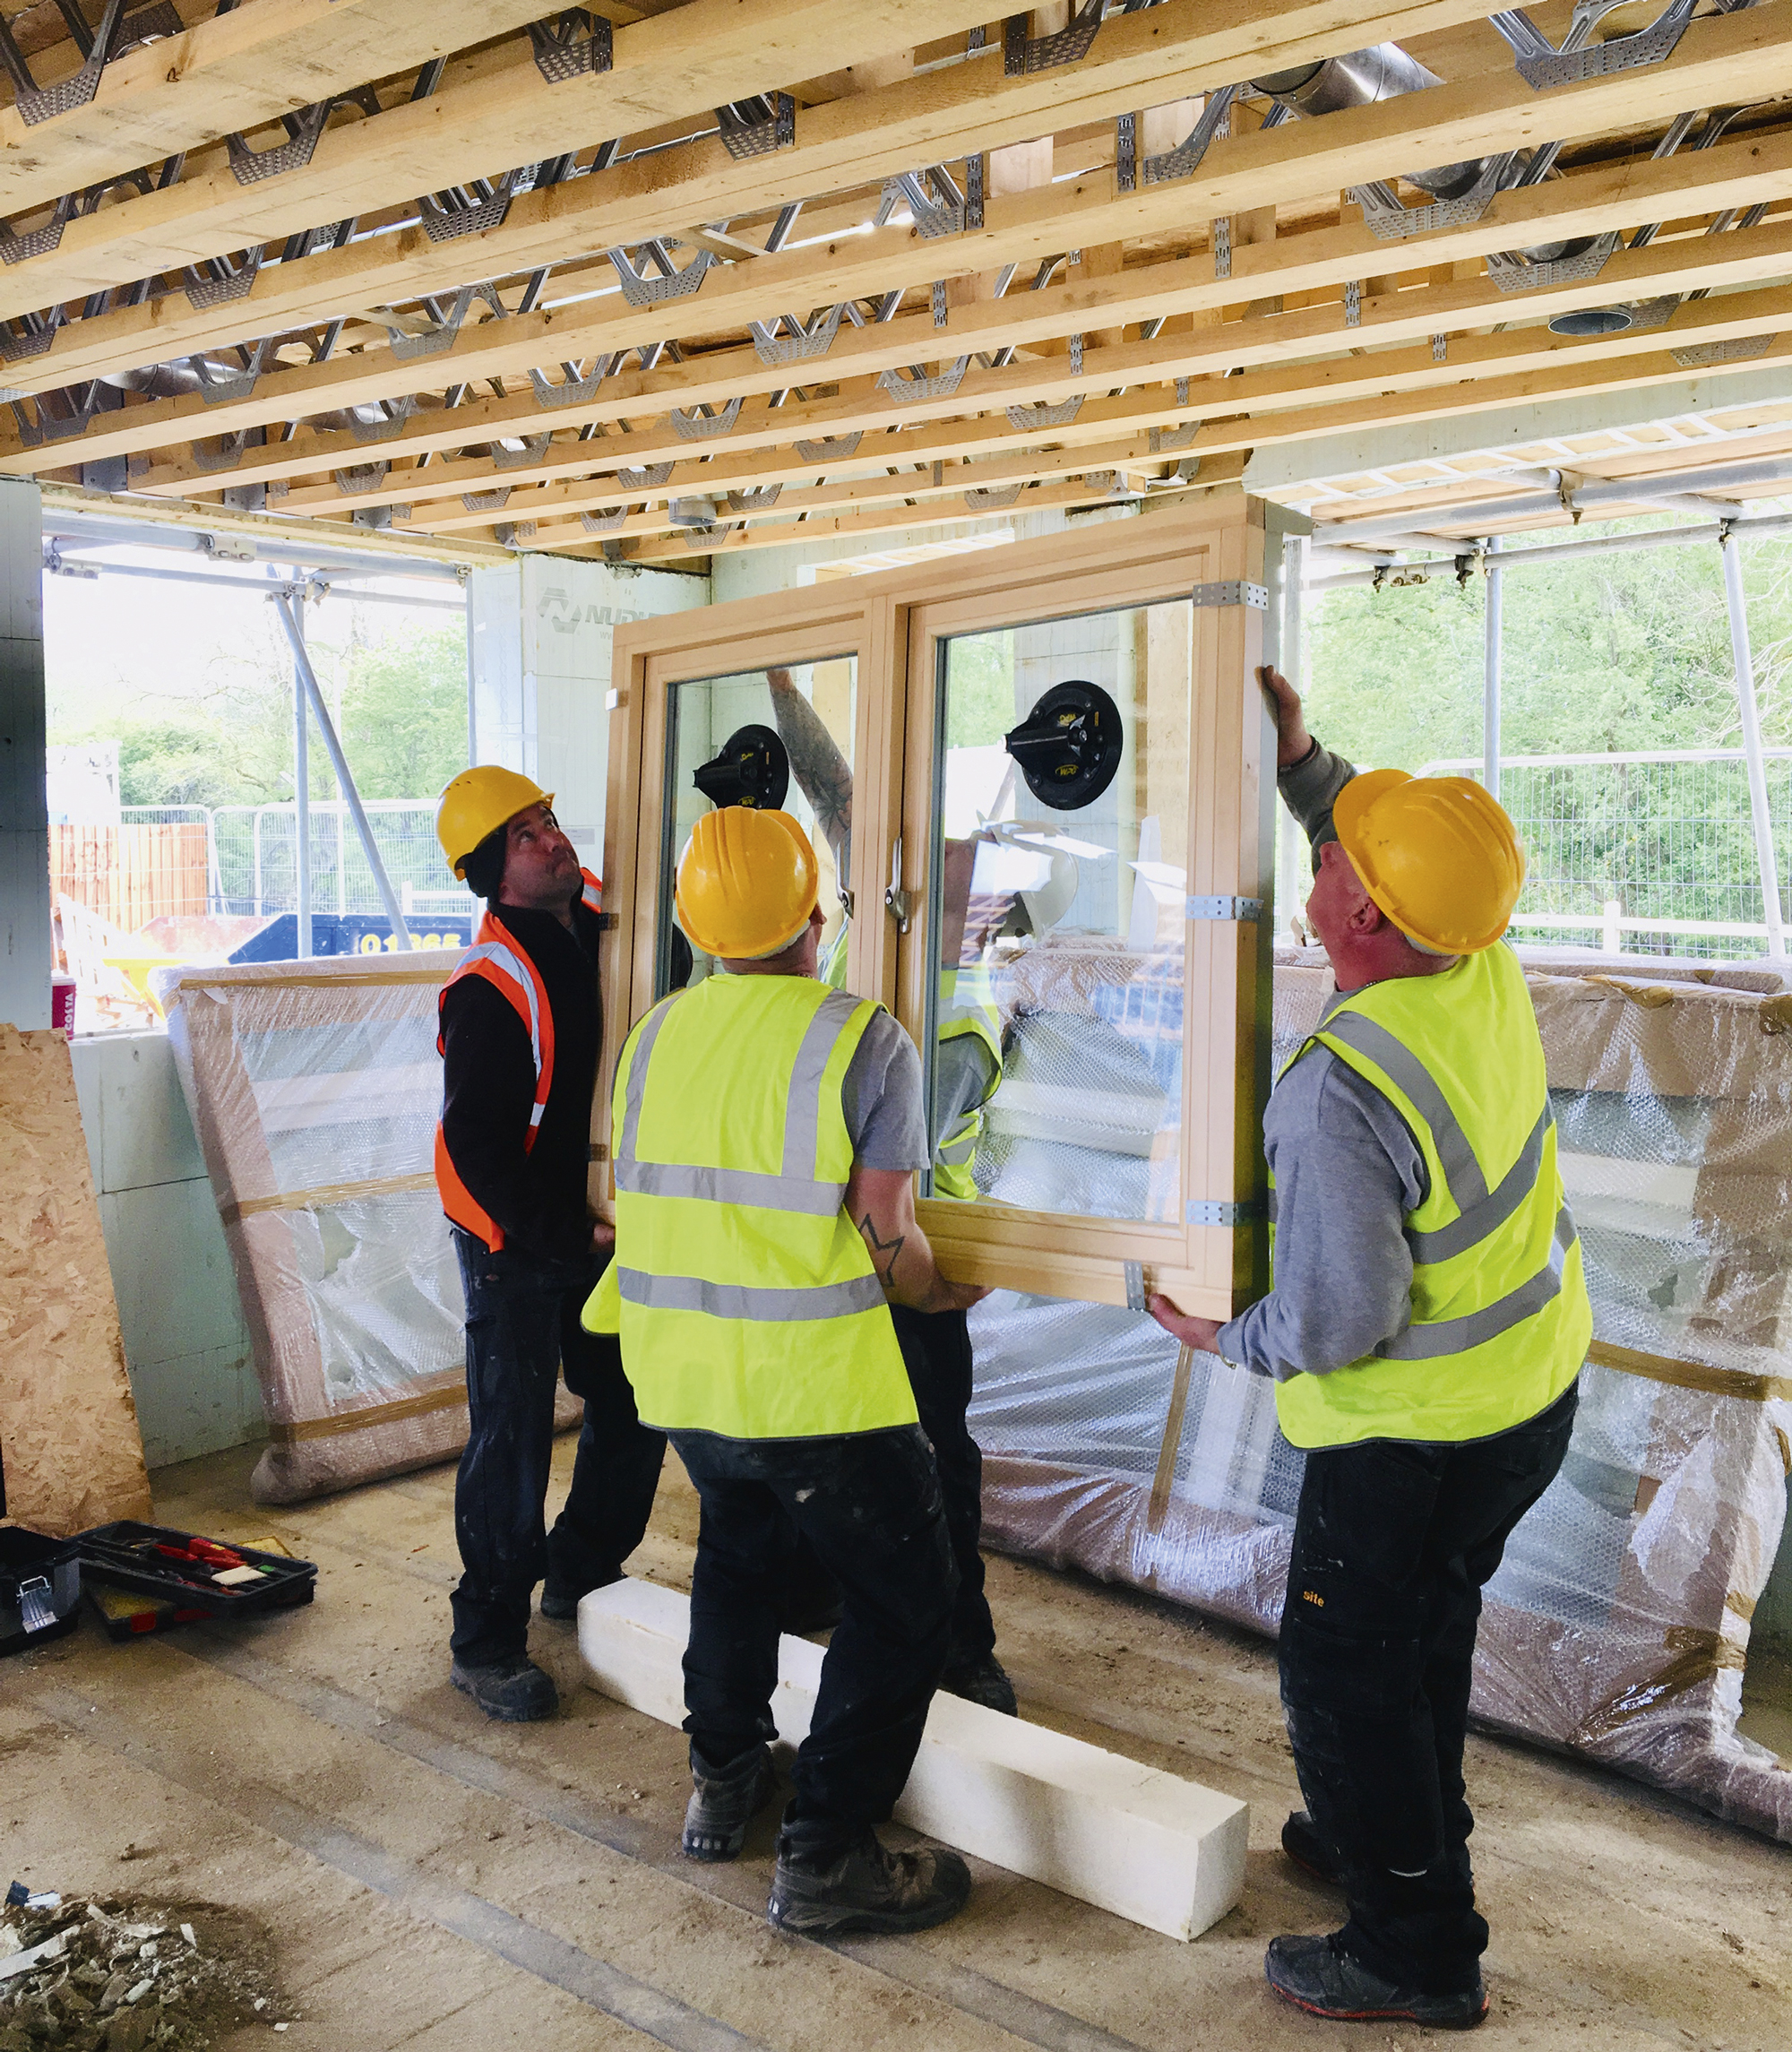
2. Offering up the windowsThe units are lifted into place by a team of two or three (depending on the window size). Suction pads are used to aid manoeuvrability. All the structural openings are deliberately oversized by 10mm all round to allow for fine adjustment on site, so everything can be properly aligned.
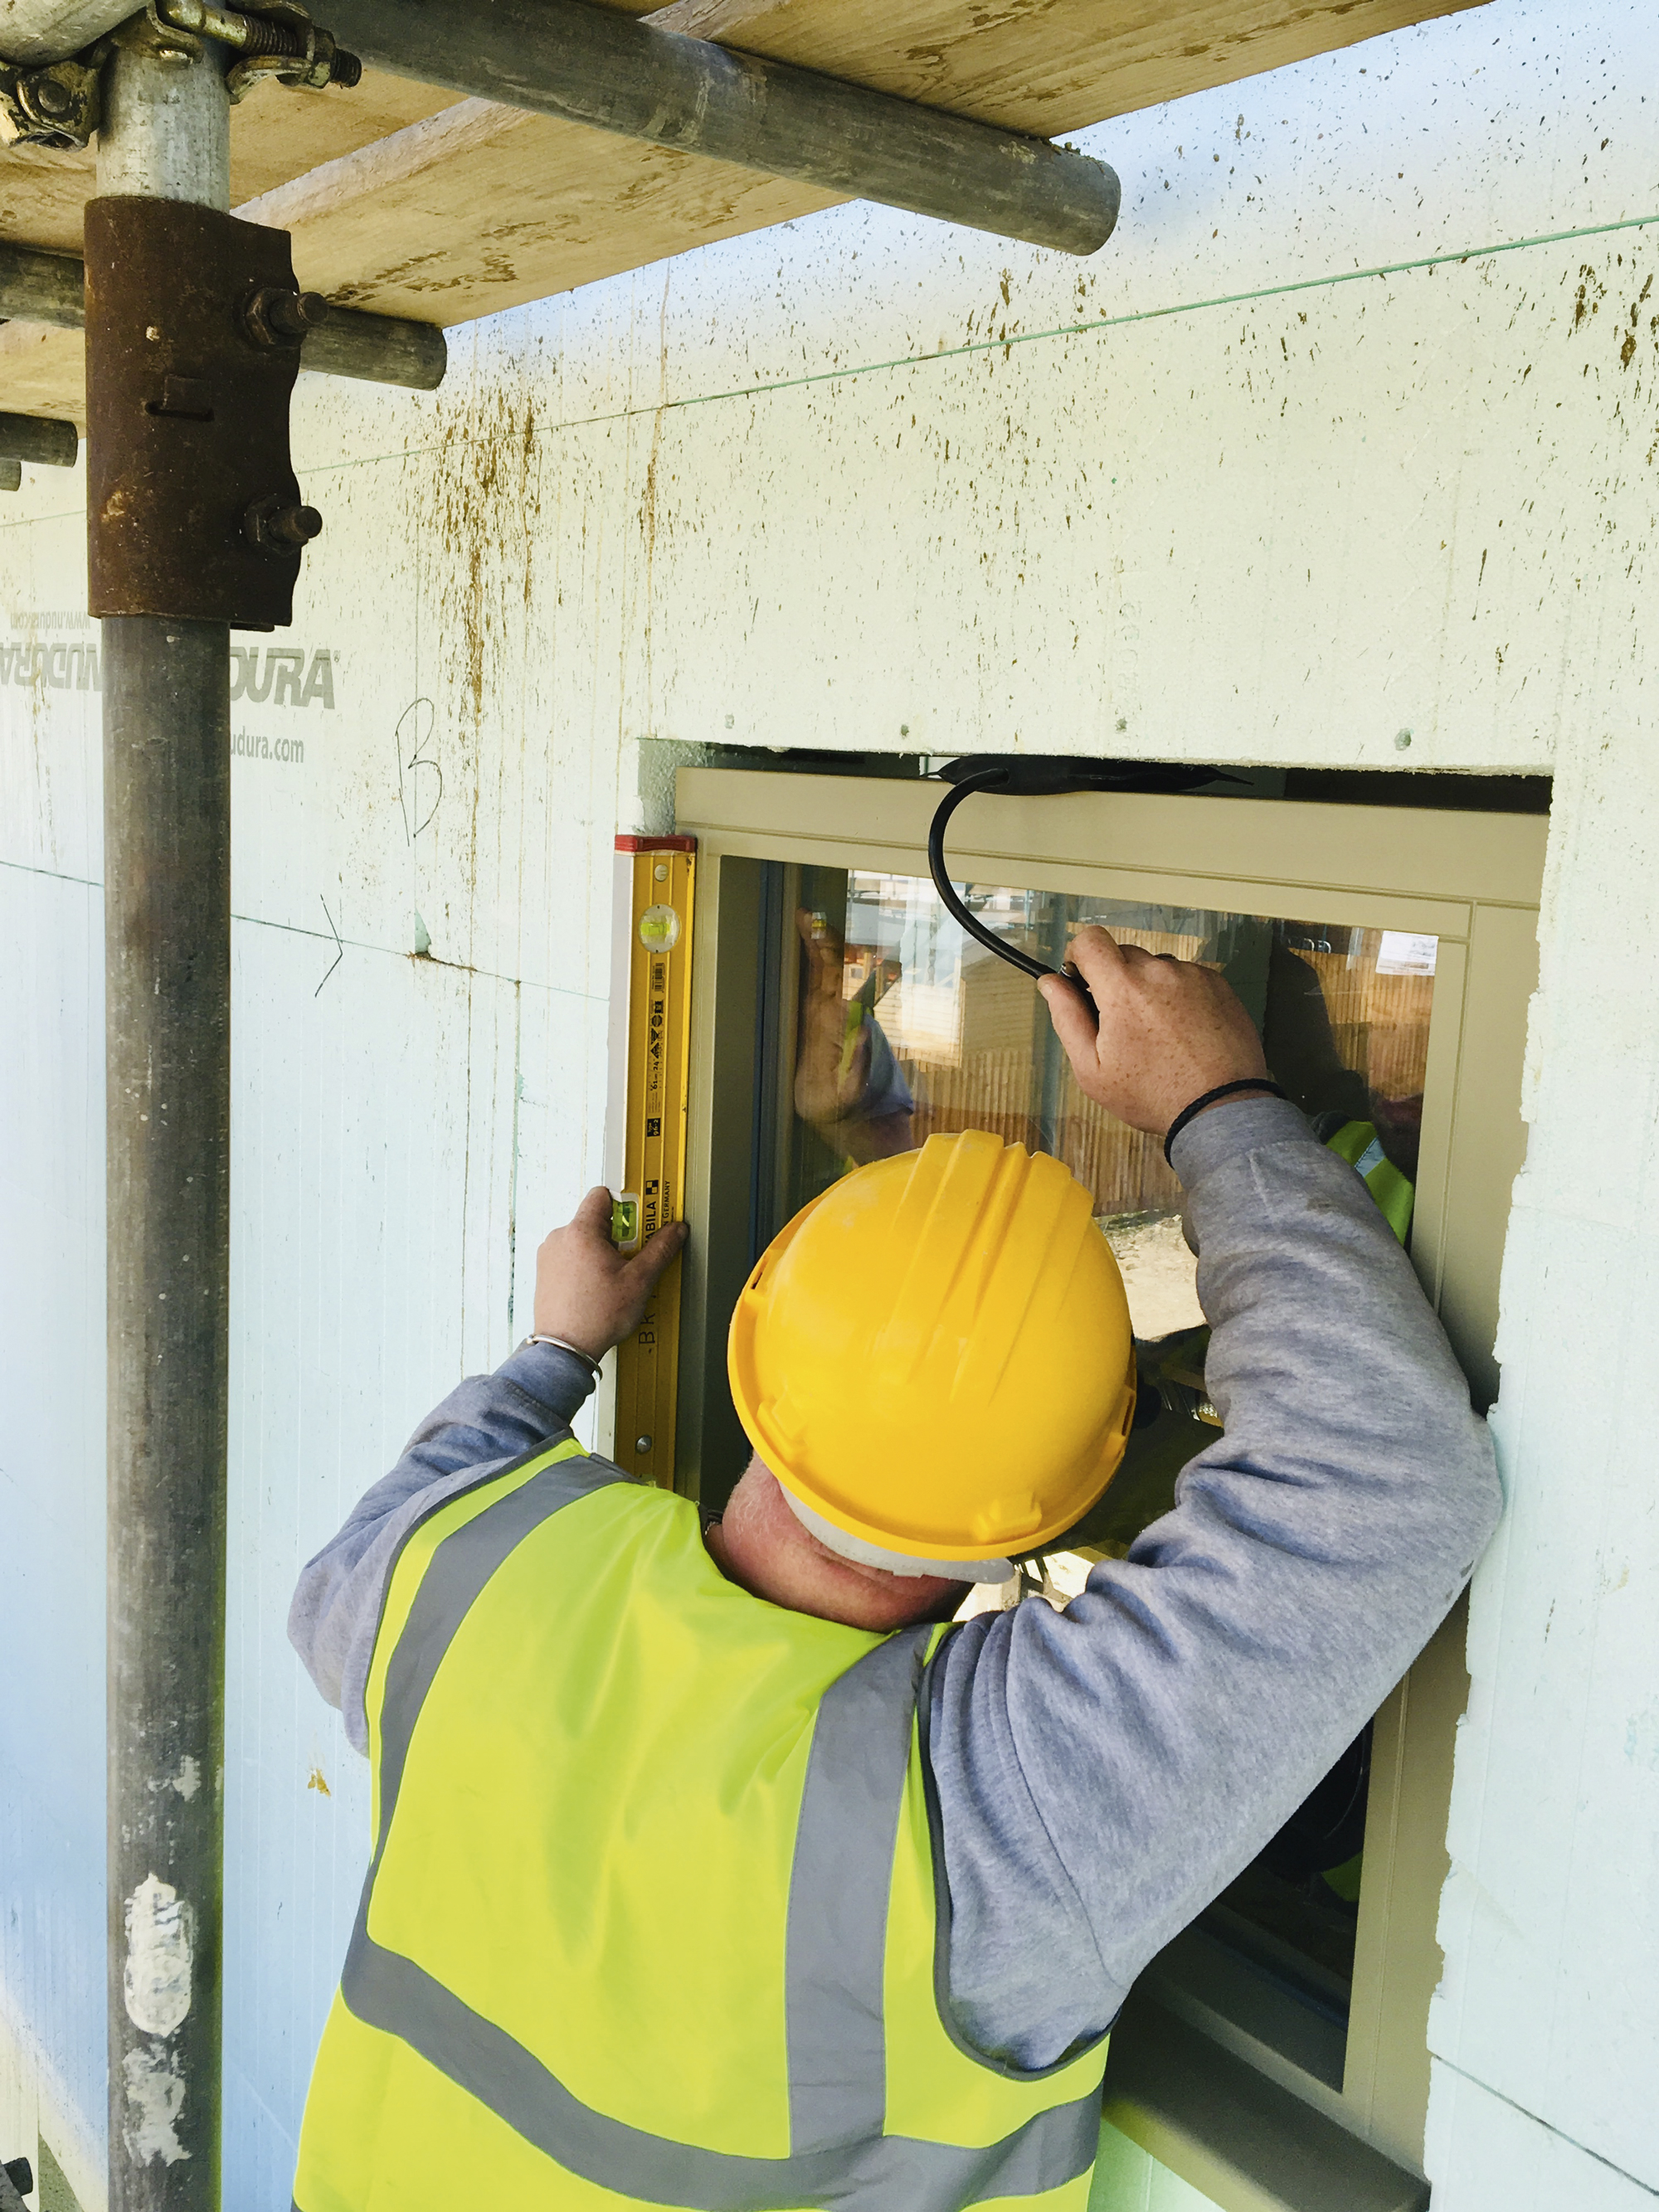
3. Getting windows level and squarePlastic packers, colour coded for size, are inserted to help get the units perfectly plumb. The inflatable bag at the top of this image helps to keep the unit in position while final adjustments are made. This includes gently tapping back the frame to get the setback right. It sounds straightforward, but it takes time and patience to get every window spot on.
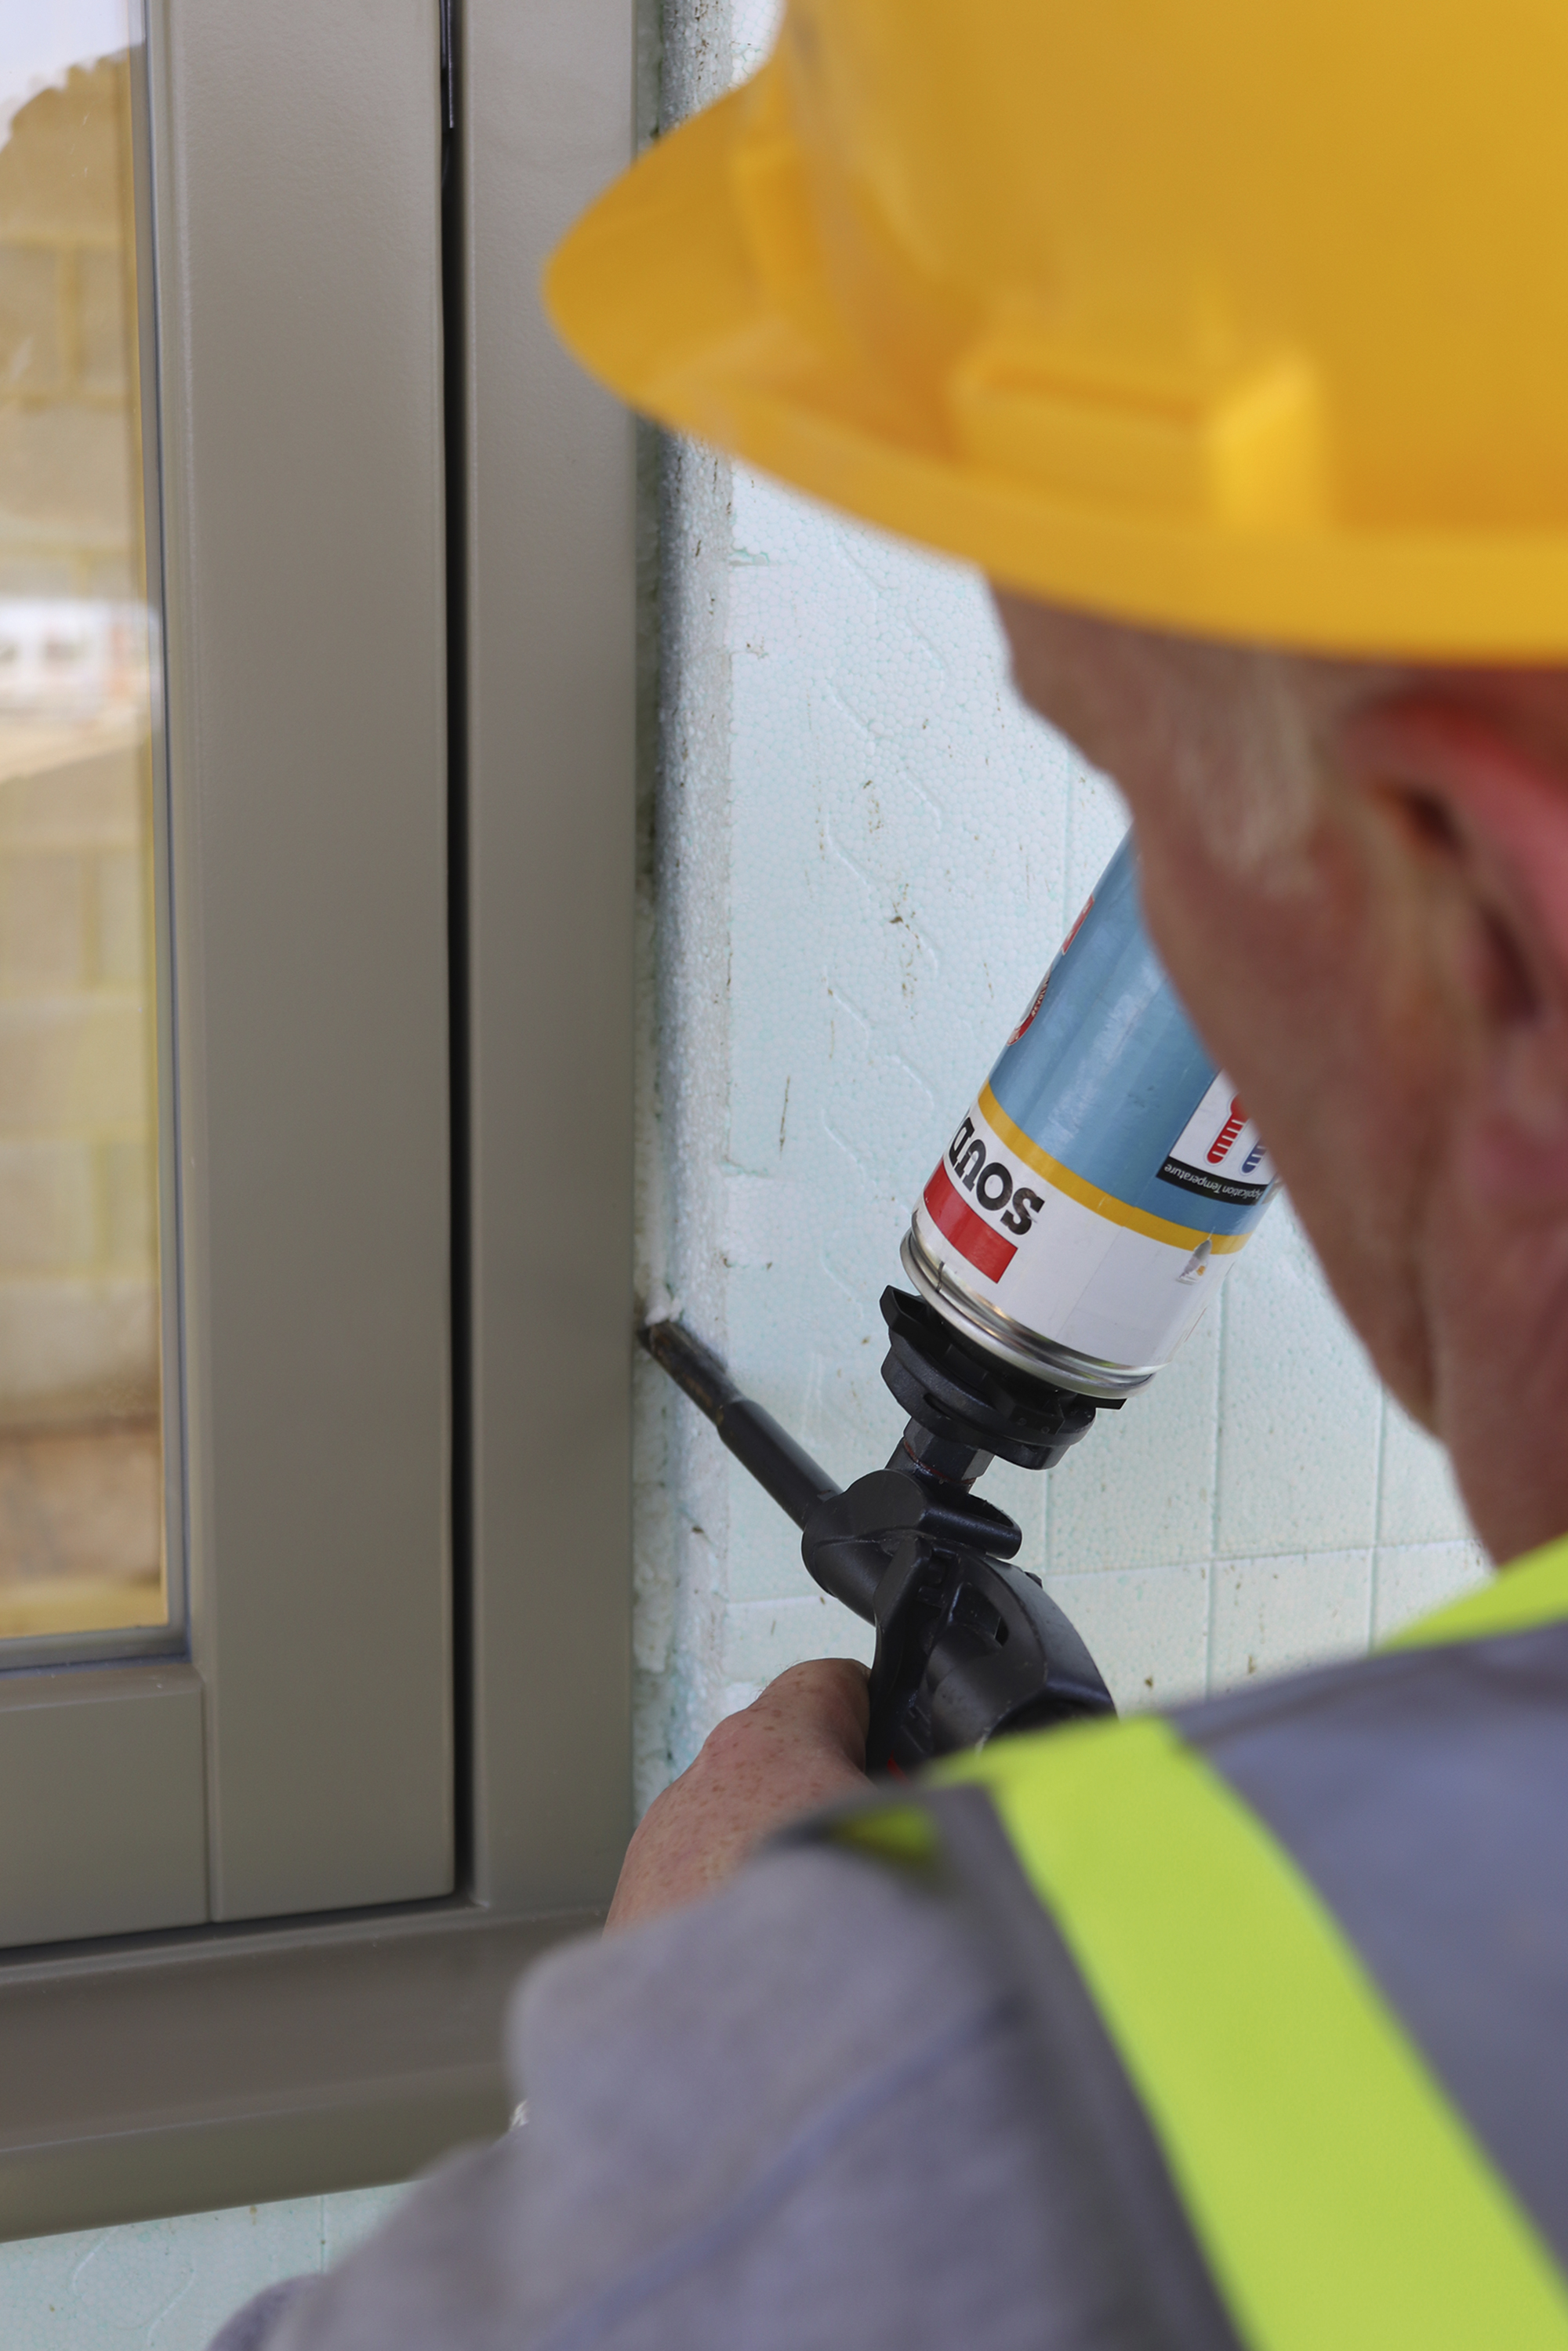
4. Sealing up the windowsOnce the window is in position, the fixing brackets are screwed into the surround from the internal side. In our case, we have a mix of timber heads and rails, with ICF polystyrene side closers (which have built-in fixing points). Expanded polystyrene insulation is then sprayed in to the gaps around the window to ensure good thermal performance. Once dry, silicone is applied to create a weathertight seal. |
We’ll be sourcing window boards, blinds etc separately. Most suppliers don’t actually provide these elements, as they get installed later in the build and are easy to source elsewhere.
With everything signed off, Matt was keen to talk about practicalities on site, to help ensure the install would be as smooth as possible.
The openings need to be completely unobscured by scaffold for access, with working platforms both inside and out. Apparently this often goes awry on self build projects, adding significant delay, as only suitably-qualified trades can modify scaffold.
Window fitting teams get lined up for jobs well in advance. So you don’t want a simple issue like this causing you to miss your installation slot.
Fitting the windows was a slick operation. Kloeber had two install teams on site to help us get the house weathertight as quickly as possible. The crews were led by site foreman Matt Vickery.
One operative preps the units in the required order. They fit the metal brackets and ironmongery, as well as sucker pads (if required), so the team can manouevre the windows without any risk of damage. Meanwhile, the rest of the crew does the install.
Precision is the order of the day with windows. After all, they’ll only look and perform as expected if they’re properly installed. Getting everything level and plumb, foaming the gaps between the wall structure and the unit, and properly finishing them off with silicone seal takes time and patience.
The Kloeber install team carefully hand-lifts a first floor window up through the open-web posijoist ceiling
Kloeber’s team did some extra prep to the full-height first floor openings, where the concrete was uneven in places. But a little chipping out and a damp-proof course (DPC) later, and these were ready for the fixed full-height panes and French doors.
Getting the glazing upstairs was a slightly nerve-racking experience, with the windows hand-balled up between the ceiling joists. It’s one of those Grand Designs-style moments where you’re just waiting for one person to lose their grip and £600 worth of window hits the deck… but, thankfully, the crew were totally in control.
The biggest job was fitting the first of our glazed corners. This included packing out, insulating and cladding around the steel post. For this section, the cills were deliberately ordered longer than required. The crew mitres them on site and seals with a metal corner bead.
Kloeber’s crew has done a very neat job, and their work here will form a template for the first floor and wow-factor apex glazing above. By the end of the week, the team had all the pre-ordered windows in and sealed externally with silicone.
They look fantastic and, importantly, the Build It House is now pretty much weathertight. We can now get cracking with first fix work, such as installing the heating and electrical infrastructure.


 Login/register to save Article for later